
Welcome to the Heart of Summer: Baking a Rustic Cherry Tart
When the sun shines bright and the days stretch long, nothing captures the essence of summer quite like a Rustic Cherry Tart. This delightful dessert, bursting with sweet cherries and accented by a nutty almond twist, is more than just a treat; it’s a celebration of love, family, and cherished memories. Whether it’s a backyard barbecue or a cozy evening with friends, this tart invites everyone to gather around the table and share in the joy of good food.
Why You’ll Love This Recipe
Here are just a few reasons why this Rustic Cherry Tart will become a staple in your kitchen:
- Easy to Make: With straightforward steps and common ingredients, even novice bakers can whip this up with confidence.
- Perfect for Sharing: Ideal for gatherings, this tart serves as a beautiful centerpiece that encourages sharing and conversation.
- Customizable: Feel free to adapt the recipe based on seasonal fruits or personal preferences.
- Nutty Flavor: The addition of almond flour brings a delightful depth to the crust, enhancing the tart’s overall flavor profile.
- Memorable Moments: Each bite carries the warmth of nostalgia, reminiscent of family gatherings and summer picnics.
Ingredient Breakdown: What You Need
Every great dish starts with quality ingredients. Here’s what you’ll need to create your Rustic Cherry Tart:
- 1 shortcrust pastry: You can use store-bought for convenience or make your own from scratch for a personal touch.
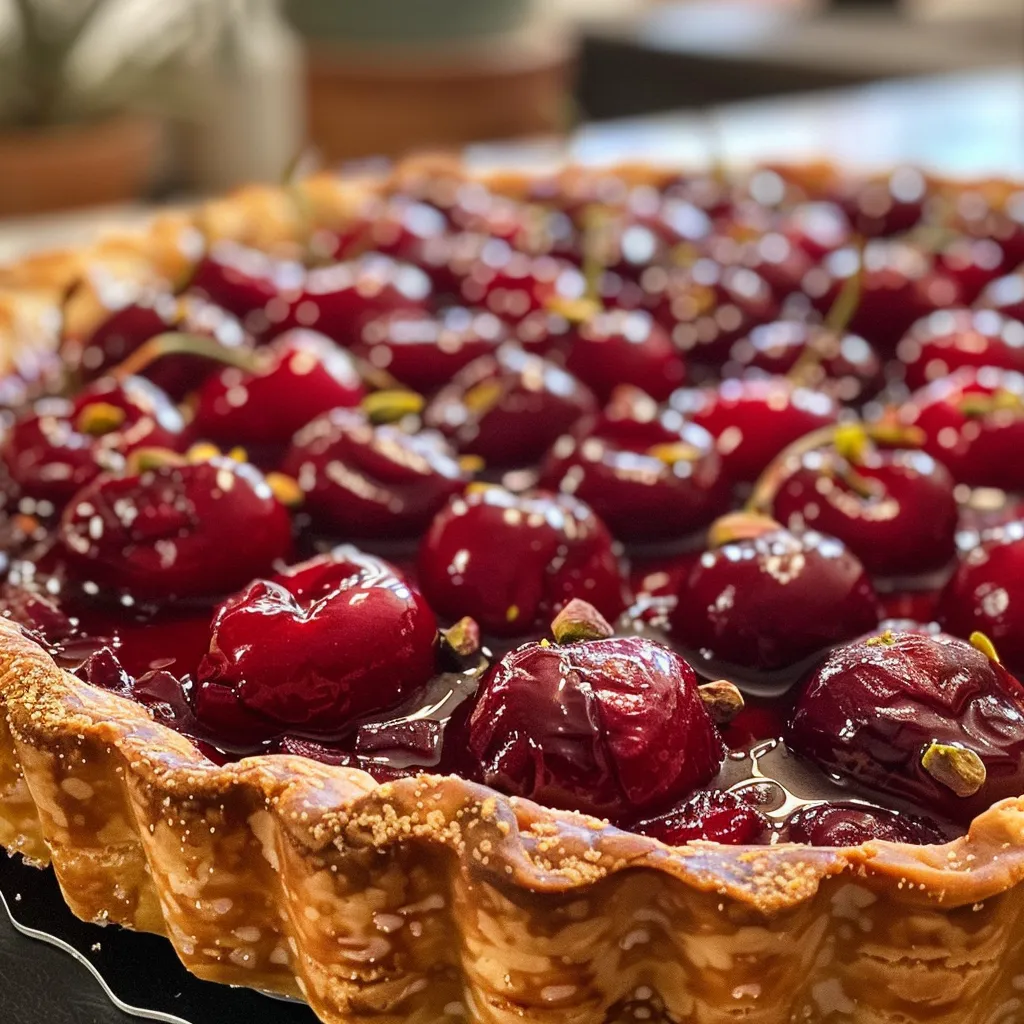
- 3 cups / 750 g. of cherries: Fresh sweet cherries are ideal, but you can also use frozen cherries if fresh ones are out of season.
- 1/3 cup / 60 g. of sugar: Adjust to taste, especially if your cherries are particularly sweet or tart.
- 2/3 cup / 60 g. of almond flour: This nutty addition gives the crust a lovely texture and flavor.
- 4 tbsp. of brown sugar: For a hint of caramel flavor, use light or dark brown sugar based on your preference.
- Pistachios: Chopped pistachios add a delightful crunch and a pop of color.
- A dash of milk: For brushing on the crust to achieve that golden, flaky finish.
Pro Tips for Perfecting Your Rustic Cherry Tart
Every baker has their secrets. Here are some expert insights to take your tart to the next level:
- Use Cold Ingredients: Ensure your butter and water are cold while making the pastry. This helps create a flaky texture.
- Don’t Overmix: When combining your dough, mix just until it comes together to avoid a tough crust.
- Let the Dough Rest: Allow your pastry dough to chill in the fridge for at least 30 minutes before rolling it out. This prevents shrinking during baking.
- Experiment with Flavors: Add a splash of almond extract to the cherry filling for an extra layer of flavor.
- Use a Baking Stone: If you have one, placing your tart on a baking stone can help achieve a perfectly crisp bottom.
- Keep an Eye on the Oven: Ovens can vary; start checking your tart a few minutes before the suggested baking time to avoid over-baking.
- Cool Before Serving: Let your tart cool for at least 15 minutes before slicing. This helps the filling set up nicely.
- Serve with Ice Cream: A scoop of vanilla or almond ice cream pairs beautifully with the warm tart.
Avoiding Common Mistakes
Even seasoned bakers can stumble. Here are some common pitfalls to avoid:
- Skipping the Chilling Step: Don’t skip chilling your dough; it’s essential for a flaky crust.
- Overfilling the Tart: Leave about 2 inches of dough around the edges to allow for folding and prevent spillage.
- Not Patting Dry the Cherries: If using frozen cherries, ensure they are thoroughly drained and dried before adding to the tart to avoid a soggy crust.
- Ignoring the Temperature: Baking at too high or too low a temperature can affect the tart’s texture. Stick to the recommended 350°F/180°C.
Delicious Variations to Try
Feel free to experiment with your Rustic Cherry Tart. Here are a few variations to inspire your creativity:
- Berry Medley: Swap out some of the cherries for blueberries or raspberries for a mixed berry tart.
- Peach Addition: Combine cherries with fresh peaches for a sweet and juicy twist.
- Gluten-Free Alternative: Substitute the all-purpose flour with a gluten-free blend to accommodate dietary needs.
- Nutty Crust: Incorporate ground walnuts or pecans into the crust for added flavor and texture.
Storage and Make-Ahead Instructions
Your Rustic Cherry Tart can be made ahead of time, making it perfect for gatherings.
- Make Ahead: Prepare the tart and bake it a day in advance. Store it in the refrigerator covered with plastic wrap.
- Freezing: You can freeze the uncooked tart for up to 3 months. Just thaw in the fridge overnight before baking.
- Leftovers: Store any leftovers in an airtight container in the fridge for up to 3 days. Reheat in the oven to restore its crispness.
Frequently Asked Questions
Here are some common questions people have about making a Rustic Cherry Tart:
- Can I use frozen cherries? Yes! Just ensure they are thawed and drained properly before use.
- How do I know when my tart is done? The crust should be golden brown, and the filling should be bubbling.
- What can I substitute for almond flour? You can use all-purpose flour or more ground nuts, like hazelnut flour, for a different flavor.
- Can I add spices to the filling? Absolutely! A pinch of cinnamon or nutmeg can elevate the flavor beautifully.
- Is this tart suitable for vegans? Substitute butter with a vegan alternative and use a plant-based milk for brushing.
- How can I make the tart more visually appealing? Decorate with fresh mint leaves or additional chopped nuts before serving.
- What’s the best way to serve the tart? Serve warm with a scoop of ice cream or whipped cream for a delightful contrast.
- How can I adjust the sweetness? Taste the cherry filling before baking and add more sugar if desired.
Nutrition Tips and Dietary Adaptations
Making this tart can be a wonderful way to incorporate seasonal fruits into your diet. Here are some tips:
- Low-Sugar Option: Use a sugar substitute or reduce the amount of sugar in the filling for a healthier version.
- Nut-Free Version: Omit almond flour and replace it with additional all-purpose flour for a nut-free tart.
- Raw Sugar: For a more natural sweetener, consider using raw sugar or honey in moderation.
Essential Equipment for Success
To make your baking experience smooth and enjoyable, consider using the following tools:
- Mixing Bowls: A variety of sizes for mixing your ingredients.
- Rolling Pin: For rolling out your pastry dough evenly.
- Pie Dish: A good quality pie dish ensures even baking and easy serving.
- Pastry Brush: For brushing milk onto the crust for that golden finish.
Serving Suggestions: Bringing it All Together
When it’s time to serve your Rustic Cherry Tart, consider some delightful accompaniments:
- Ice Cream: A scoop of vanilla or pistachio ice cream perfectly complements the tart’s sweetness.
- Whipped Cream: Lightly sweetened whipped cream adds a touch of elegance.
- Fresh Berries: Serve alongside fresh berries for a pop of color and flavor contrast.
Conclusion: A Slice of Love
Baking a Rustic Cherry Tart is not just about the ingredients; it’s about the love and memories you create while making it. With every slice, you share a piece of your heart, making it a cherished tradition in your home. So gather your loved ones, roll up your sleeves, and enjoy the sweetness of summer together. Happy baking!

Rustic Cherry Tart
Ingredients
Dough
- 1 shortcrust pastry shortcrust pastry
Fruits
- 3 cups cherries
Sweeteners
- 0.33 cup sugar
- 0.67 cup almond flour
- 4 tbsp brown sugar
Toppings
- a dash milk milk
- handful chopped pistachios pistachios
Instructions
- Mix cherries with sugar and let stand for 20 minutes.
- Roll out the pastry, sprinkle with almond flour and brown sugar.
- Place cherries in the center, fold edges, and brush with milk.
- Bake at 350°F/180°C for 20 minutes, then sprinkle with pistachios and serve.