
Creating Comfort: The Joy of Peanut Butter Energy Balls
Welcome to a delightful journey through the heart of cooking, where every bite tells a story and every ingredient holds a memory. Today, we’re diving into a cherished recipe: **Peanut Butter Energy Balls**. These little delights not only capture the essence of comfort but also offer a nutritious snack that brings joy to everyone who savors them. Whether you’re seeking a quick energy boost or a simple treat to share with loved ones, this recipe is your go-to solution. Let’s embark on this culinary adventure together!
Why You’ll Love This Recipe
These energy balls are not just easy to make; they also pack a punch in flavor and nutrition. Here are five heartfelt reasons to adore this recipe:
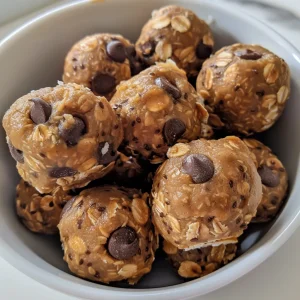
- Wholesome Ingredients: Made with old-fashioned oats, creamy peanut butter, and flaxseed, each ball is filled with nutrients that fuel your body.
- Quick and Easy: With minimal prep time, you can whip up these energy balls in just 15 minutes, making them perfect for busy days.
- Customizable: Feel free to personalize your energy balls with different add-ins like nuts, seeds, or dried fruits, catering to your unique taste.
- Perfect for Sharing: These treats are wonderful for gatherings, lunchboxes, or just an afternoon snack at home with family.
- Healthy Indulgence: Satisfy your sweet tooth in a guilt-free way with a recipe that balances flavor and nutrition beautifully.
Ingredient Breakdown
Let’s delve into the ingredients that make these energy balls a true delight:
- 1.5 cups old-fashioned oats: These oats provide a hearty base and a chewy texture. You can use gluten-free oats if needed, ensuring everyone can enjoy them.
- 1 cup creamy peanut butter: A rich source of protein and healthy fats, creamy peanut butter binds the ingredients while adding great taste. For nut-free alternatives, consider sunflower seed butter or creamy tahini.
- 1/2 cup mini chocolate chips: These little morsels add sweetness and joy. Opt for dark chocolate chips for a healthier twist!
- 1/2 cup ground flaxseed: Packed with omega-3 fatty acids and fiber, flaxseed boosts the nutritional profile. If you don’t have flaxseed, chia seeds can be a great substitute.
- 4 tablespoons honey (or maple syrup or agave): A natural sweetener that binds everything together, adding a touch of sweetness. Choose maple syrup for a vegan option.
Pro Tips for Success

To ensure your energy balls turn out perfectly, here are some expert insights:
- Mix Thoroughly: Ensure all ingredients are well combined to achieve the best flavor and texture.
- Chill Before Rolling: Refrigerating the mixture for 10-15 minutes makes it easier to roll into balls.
- Use a Cookie Scoop: For uniformity and ease, a cookie scoop can help create evenly sized energy balls.
- Experiment with Add-ins: Consider adding dried fruits, shredded coconut, or even protein powder to elevate your energy balls.
- Adjust Sweetness: Depending on your taste, feel free to add more or less honey or maple syrup.
- Store Properly: Keep your energy balls in an airtight container in the fridge to maintain freshness.
- Make Ahead: These energy balls can be made in advance and stored for quick snacks throughout the week.
- Try Different Nut Butters: While peanut butter is classic, almond or cashew butter can add a delightful twist!
- Use a Silpat Mat: When rolling, using a silicone mat can help prevent the mixture from sticking.
Avoiding Common Mistakes
Even the most experienced cooks can face challenges. Here’s how to troubleshoot:
- Too Sticky?: If the mixture is too sticky to roll, try adding a bit more oats or flaxseed to thicken it up.
- Too Dry?: If your mixture feels too dry, a splash of milk or extra peanut butter can help bring it together.
- Not Sticking Together?: Ensure all ingredients are mixed well and chilled properly before rolling.
Variations to Delight Your Palate
Feel free to switch things up! Here are four delightful variations to inspire your creativity:
- Chocolate-Dipped Energy Balls: After rolling, dip your energy balls in melted dark chocolate for an indulgent treat.
- Nutty Coconut Energy Balls: Add shredded coconut and chopped nuts for a tropical twist.
- Berry Bliss Balls: Incorporate dried cranberries or blueberries for a fruity punch.
- Spiced Pumpkin Energy Balls: Add pumpkin puree and pumpkin spice for a seasonal flavor that’s perfect for fall.
Storage and Make-Ahead Instructions
To keep your energy balls fresh and delicious:
- Refrigeration: Store in an airtight container in the fridge for up to 2 weeks.
- Freezing: For longer storage, freeze them in a single layer on a baking sheet, then transfer to a container for up to 3 months.
- Thawing: Simply let them sit at room temperature for a few minutes before enjoying.
Frequently Asked Questions
Here are some common questions about Peanut Butter Energy Balls:
- Are energy balls healthy? Yes! These energy balls are packed with wholesome ingredients that provide nutrients and energy.
- How many energy balls can I eat a day? Moderation is key; 1-2 balls make a great snack without overdoing it on calories.
- Can I use almond butter instead of peanut butter? Absolutely! Almond butter is a delicious alternative that adds a unique flavor.
- Can I make these vegan? Yes! Use maple syrup instead of honey and ensure your chocolate chips are dairy-free.
- What’s the best way to serve these? They make a fantastic snack on their own or can be served alongside yogurt or fruit for a balanced meal.
- Can kids help make these? Definitely! This recipe is simple enough for children to participate in, making it a fun family activity.
- Can I add protein powder to the mix? Yes! Adding protein powder can enhance the nutritional content, making them even more filling.
- What’s the best way to pack them for lunch? Place them in a small container or a snack bag, and they’re ready to go for lunch or a snack on the road.
Nutrition Tips and Dietary Adaptations
For those looking to adapt this recipe to fit specific dietary needs, consider the following:
- Gluten-Free: Use certified gluten-free oats to make this recipe suitable for gluten-intolerant individuals.
- Low Sugar: Reduce the amount of honey or maple syrup, or substitute with a sugar-free sweetener.
- Protein Boost: Add your favorite protein powder to enhance the protein content, perfect for post-workout recovery.
- Nut-Free: Substitute peanut butter with sunflower seed butter for a nut-free option that’s just as tasty.
Essential Equipment
Here’s what you’ll need to create these delightful energy balls:
- Mixing Bowl: A medium-sized bowl for combining ingredients.
- Spatula: For thorough mixing and scraping the sides of the bowl.
- Cookie Scoop: Ensures uniform sizing for your energy balls.
- Airtight Container: For storing your finished energy balls and keeping them fresh.
Serving Suggestions
These energy balls are versatile and can be enjoyed in various ways:
- As a Snack: Perfect for a quick pick-me-up between meals.
- Post-Workout Fuel: A great source of energy after a workout session.
- In Lunchboxes: Add them to school or work lunches for a healthy treat.
- With Coffee or Tea: Enjoy with your favorite hot beverage for a cozy afternoon snack.
Conclusion
Cooking is more than just a task; it’s about creating memories and sharing love through food. These **Peanut Butter Energy Balls** are a testament to that spirit. With their easy preparation and endless customization options, you’ll find that they not only nourish your body but also warm your heart. So gather your loved ones, get into the kitchen, and make these delightful energy balls together. After all, the best recipes are those made with love, laughter, and a little bit of peanut butter magic!
Peanut Butter Energy Balls
Ingredients
Dry ingredients
- 1.5 cups old-fashioned oats
- 1 cup creamy peanut butter
- 1/2 cup mini chocolate chips
- 1/2 cup ground flaxseed
- 4 tablespoons honey (or maple syrup or agave)
Instructions
- Combine oats, peanut butter, chocolate chips, flaxseed, and honey in a bowl. Mix until fully combined.
- Chill the mixture in the fridge for 10-15 minutes to set.
- Roll into 18 bite-sized balls.
- Store in the fridge for up to 2 weeks.