
There’s something incredibly special about the aroma of freshly baked dinner rolls wafting through the house. Memories come rushing back—of family gatherings, laughter, and the warmth of loved ones around the dinner table. This recipe for Easy Cast Iron Dinner Rolls is not just about making bread; it’s about crafting a loving experience that you can share with those who matter most. Let’s dive into the heartwarming world of homemade rolls, all made effortlessly in a trusty cast iron skillet.
Why You’ll Love This Recipe
These rolls are more than just a side dish; they’re a heartfelt addition to any meal. Here are five reasons you’ll adore this recipe:
- Comforting Flavor: The subtle sweetness from honey and the richness of butter create a flavor that’s both warm and inviting.
- Easy to Make: With simple ingredients and straightforward steps, this recipe is perfect for bakers of all levels. You can also involve your children in the process!
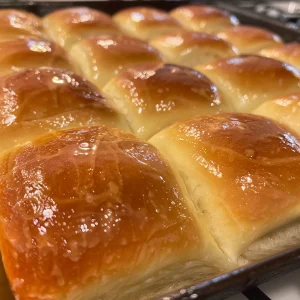
- Perfect Texture: The rolls come out soft and fluffy, with a slightly crispy exterior thanks to the cast iron skillet.
- Versatile Pairing: These dinner rolls complement any meal, from hearty stews to light salads, making them a staple at every gathering.
- Sharing Tradition: Each roll is a symbol of love and togetherness, reminding us that food connects us to our roots and to each other.
Ingredients Breakdown
Let’s gather what you need to create these delightful rolls:
- 1 cup warm milk (110º F): This activates the yeast, ensuring your rolls rise beautifully.
- 2 1/4 teaspoons instant yeast: The star ingredient that makes these rolls rise effortlessly.
- 1 egg: Adds richness and helps bind the ingredients.
- 4 tablespoons melted butter: This gives the rolls a deliciously rich flavor.
- 3 tablespoons honey or sugar: Sweetens the rolls just enough to make them irresistible.
- 1 teaspoon salt: Enhances the flavors of the other ingredients.
- 4 cups flour: The foundation of your dough; all-purpose flour works beautifully.
- 1 egg (for wash): This will give your rolls a lovely golden color.
- 1 tablespoon water (for wash): Helps to thin the egg for an even wash.
If you’re looking to make substitutions, here are some ideas:
- Milk: You can also use almond milk or oat milk for a dairy-free option.
- Butter: Coconut oil can replace butter for a dairy-free version.
- Honey: Maple syrup or agave nectar can also work well.
- Flour: Whole wheat flour can be substituted for all-purpose flour for a heartier texture.
How to Make Easy Cast Iron Dinner Rolls
Now, let’s get our hands doughy!
- Warm your milk and mix it with the yeast. Let it sit for a minute until it gets foamy.
- Combine the egg, melted butter, and honey in a big bowl. Pour in the yeast mixture and whisk until smooth.
- Add two cups of flour and the salt. Stir until combined, then add the rest of the flour. Use a dough hook to mix for five minutes.
- Cover the bowl and let the dough rest for ten minutes.
- Divide the dough into twelve equal pieces and roll each into a tight ball. Place them in your oiled cast iron skillet.
- Cover the skillet and let the rolls rise for one hour until they puff up and double in size.
- Beat one egg with a tablespoon of water and brush this wash over the risen rolls.
- Bake at 375 degrees for about twenty minutes until golden and firm. Brush with melted butter right after baking.
Pro Tips for Perfect Rolls

To ensure your rolls turn out perfectly every time, consider these expert insights:
- Check the yeast freshness: Always make sure your yeast is active. A quick test—mix it with warm water and sugar; if it bubbles, you’re good to go!
- Let the dough rise in a warm place: Yeast loves warmth! Find a cozy spot in your kitchen for the dough to rise.
- Knead the dough well: Proper kneading develops gluten, giving your rolls that perfect fluffy texture.
- Don’t rush the rising: Give your dough plenty of time to rise; this step is crucial for soft rolls.
- Use a thermometer: Use an instant-read thermometer to check the milk temperature; it should be around 110°F to activate the yeast.
- Experiment with herbs: For added flavor, try mixing in fresh herbs like rosemary or thyme into the dough.
- Cover with a damp cloth: This keeps the dough from drying out while it rises.
- Store in an airtight container: To keep the rolls fresh, store them in a container lined with a paper towel to absorb moisture.
Common Mistakes and Troubleshooting
Every baker has their mishaps, but don’t fret! Here are some common mistakes and tips for troubleshooting:
- Rolls not rising: Ensure the yeast is fresh and the dough is kept in a warm environment.
- Too dense rolls: This can happen if too much flour is added. Measure carefully and avoid adding flour beyond the recipe.
- Burnt bottoms: If your skillet gets too hot, consider lowering the oven temperature or using a baking sheet underneath.
- Dry rolls: Be sure to cover the rolls while they rise and check your oven temperature for accuracy.
Variations to Try
Let’s shake things up! Here are a few delicious variations to this classic recipe:
- Garlic Herb Rolls: Add minced garlic and chopped fresh herbs into the dough for a savory twist.
- Cinnamon Sugar Rolls: Before shaping, sprinkle cinnamon and sugar on the dough, then roll it up for a sweet treat.
- Cheesy Rolls: Fold in shredded cheese (like cheddar or mozzarella) into the dough for a cheesy delight.
- Stuffed Rolls: Fill the centers with a dollop of your favorite jam or savory filling before baking.
Storage and Make-Ahead Instructions
Want to prepare in advance? Here’s how:
- Make Ahead: You can prepare the dough a day in advance. Cover and refrigerate it after mixing, bringing it to room temperature before the final rise.
- Storing Leftovers: Keep any leftover rolls in an airtight container for up to three days at room temperature or freeze them for longer storage.
- Reheating: To warm them up, pop them in a 350°F oven for about 10 minutes or microwave for a few seconds.
Comprehensive FAQ
Here are some common questions you may have about making these rolls:
- Can I use active dry yeast instead of instant yeast? Yes, just activate it in warm water before adding it to the recipe.
- What if I don’t have a cast iron skillet? You can use a regular baking dish, but cast iron gives a unique texture.
- How can I tell when my rolls are done? They should be golden brown and sound hollow when tapped.
- Can I freeze the dough? Absolutely! Shape the rolls, freeze them on a baking sheet, and then transfer to a freezer bag.
- What’s the best way to serve these rolls? Warm with a smear of butter or alongside your favorite soup or stew.
- How long do these rolls last? They’re best enjoyed fresh but can last up to three days at room temperature.
- Can I add nuts or dried fruits? Yes! Fold in chopped nuts or dried fruits for added texture and flavor.
- What if my dough is too sticky? If the dough is sticky, add a little flour at a time until it’s manageable.
Nutritional Tips and Dietary Adaptations
For those mindful of dietary needs, here are some tips:
- Whole Wheat Flour: Swap half of the all-purpose flour for whole wheat for added fiber.
- Reduce Sugar: If you prefer less sweetness, you can cut the honey or sugar by half without affecting the texture.
- Dairy-Free Options: Use non-dairy milk and coconut oil to make these rolls completely dairy-free.
Equipment Recommendations
Here’s what you’ll need to whip up these rolls:
- Cast Iron Skillet: Essential for that perfect crust and texture.
- Dough Hook Mixer: While you can knead by hand, a stand mixer makes the process easier.
- Instant-Read Thermometer: To ensure your milk is at the right temperature for the yeast.
- Measuring Cups and Spoons: Accurate measurements lead to perfect rolls.
Serving Suggestions
To truly make your meal complete, consider pairing these rolls with:
- Hearty Soups: A warm bowl of chicken noodle or creamy tomato soup is a perfect match.
- Roasted Vegetables: Their earthy flavors complement the sweetness of the rolls beautifully.
- Salads: Light and refreshing salads balance the richness of the bread.
- Gravy Dishes: Pour some gravy over the rolls for a comforting treat.
In the end, cooking is not just about food; it’s about connection. These Easy Cast Iron Dinner Rolls invite you to fill your home with warmth and love, making every meal a cherished memory. So roll up your sleeves, gather your ingredients, and let’s create something beautiful together!
Easy Cast Iron Dinner Rolls
Ingredients
Dough
- 1 cup warm milk (110º F)
- 2 1/4 teaspoons instant yeast
- 1 egg
- 4 tablespoons melted butter
- 3 tablespoons honey or sugar
- 1 teaspoon salt
- 4 cups flour
- 1 egg for wash
- 1 tablespoon water (for wash)
Instructions
- Mix warm milk with yeast and let sit until foamy.
- Combine egg, melted butter, honey, and yeast mixture; whisk until smooth.
- Add flour and salt; knead with a dough hook for 5 minutes.
- Let dough rest covered for 10 minutes, then divide into 12 balls and place in oiled skillet.
- Let rolls rise for 1 hour, then brush with egg wash and bake at 375°F for 20 minutes.