
Embrace the Joy of Baking: Why You Need This Red Velvet Cheesecake in Your Life
Every holiday season, there’s a magical aroma that fills the air, reminiscent of family gatherings and cherished traditions. One dessert that captures the heart of these moments is the Christmas Red Velvet Cheesecake. This delightful treat not only brings a burst of color to your table but also combines the rich flavors of red velvet with the creamy goodness of cheesecake. Imagine slicing into a velvety cheesecake layer, the vibrant red contrasting beautifully with the snowy whipped cream topping. This cheesecake isn’t just a dessert; it’s an experience, a way to share love and memories with friends and family. In this guide, we’ll explore the ins and outs of creating the perfect red velvet cheesecake, ensuring that it becomes a staple at your festive gatherings.
Why You’ll Love This Recipe
This cheesecake is a true celebration of flavor and nostalgia. Here are five reasons why you’ll adore making and sharing this recipe:
- Rich Flavor Combination: The blend of creamy cheesecake and the subtle chocolate notes of red velvet creates a luscious flavor profile that is simply irresistible.
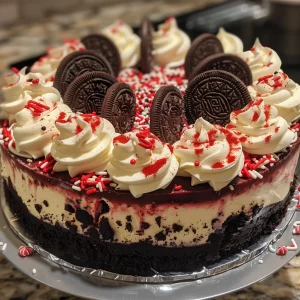
- Visual Appeal: Its striking red color makes it a stunning centerpiece for holiday tables, sure to impress your guests.
- Easy to Make: With straightforward ingredients and simple steps, this cheesecake is accessible for bakers of all skill levels.
- Perfect for Sharing: Whether it’s a holiday party or a cozy family dinner, this cheesecake is designed to be shared, fostering connection and joy.
- Versatile Dessert: Pair it with different toppings or serve it plain; the possibilities are endless, making it suitable for any occasion.
Ingredient Breakdown
Let’s dive into the essential ingredients for this irresistible Christmas Red Velvet Cheesecake, along with some substitutions to tailor it to your preferences:
- 24 Oreo Cookies (Crushed): These form the base of your crust, adding a rich chocolate flavor. You can substitute with chocolate graham crackers for a twist.
- 1/2 cup Unsalted Butter (Melted): The butter binds the crust together and enhances the flavor. Use coconut oil for a dairy-free version.
- 16 oz Cream Cheese (Softened): Key to achieving that creamy texture; for a lighter version, consider using Neufchâtel cheese.
- 1 cup White Sugar (Adjust to taste): Sweetens the cheesecake; feel free to reduce the amount if you prefer a less sweet flavor.
- 1 cup Heavy Whipping Cream (Or Cool Whip): This adds lightness to the cheesecake; you can use coconut cream for a dairy-free option.
- 1 tsp Vanilla Extract (Or peppermint extract): Adds depth. Peppermint extract is a lovely holiday twist!
- 1/4 cup Cocoa Powder (Adjust to taste): Enhances the chocolate flavor; opt for Dutch-processed cocoa for a richer taste.
- 1 tbsp Red Food Coloring (Adjust to desired shade): This gives the cheesecake its signature red hue; gel coloring often yields a more vibrant result.
- 1/2 cup Christmas Sprinkles: For festive decoration; customize based on your holiday theme.
- 1 cup Whipped Cream (Fresh or store-bought): A fluffy topping that complements the cheesecake; homemade is always a treat!
- 1/2 cup Mini Oreos (For decoration): These add a charming touch and a bit of crunch to the top of your cheesecake.
Expert Tips for Perfecting Your Cheesecake

Creating a flawless red velvet cheesecake is an art, and these expert tips will help you achieve bakery-quality results:
- Room Temperature Ingredients: Ensure your cream cheese and eggs are at room temperature to create a smooth batter without lumps.
- Don’t Overmix: Mix just until combined to prevent air bubbles, which can cause cracks in the cheesecake.
- Water Bath Method: Baking your cheesecake in a water bath helps maintain moisture, resulting in a creamier texture.
- Cool Gradually: After baking, let your cheesecake cool in the oven with the door ajar to prevent sudden temperature changes that can lead to cracks.
- Chill Overnight: Allowing your cheesecake to set overnight in the fridge enhances the flavors and improves the texture.
- Decorate Before Serving: Add whipped cream and sprinkles just before serving for the best presentation.
- Use a Sharp Knife: For clean slices, dip your knife in hot water and wipe it clean between cuts.
- Try Different Flavors: Experiment with flavored extracts, like almond or hazelnut, to give your cheesecake a unique twist.
Common Mistakes and Troubleshooting
Even the best bakers can run into issues. Here are some common pitfalls and how to avoid them:
- Cracks in the Cheesecake: This often occurs from overmixing or baking at too high a temperature. Ensure you bake at a low temperature with a water bath.
- Cheesecake Too Dense: If your cheesecake is overly dense, it may be due to too much mixing or not enough aeration, so mix carefully.
- Not Sweet Enough: Adjust sugar to taste, but remember that the flavors intensify as it chills.
- Discoloration: If your cheesecake loses its vibrant color, it’s likely due to overbaking. Monitor closely for doneness.
Delicious Variations to Try
Make this cheesecake your own with these delightful variations:
- Chocolate Swirl: Add melted chocolate to the batter for a decadent chocolate red velvet cheesecake.
- Nutty Twist: Incorporate finely chopped nuts into the crust for added crunch and flavor.
- Fruit Topping: Top with fresh berries for a refreshing contrast to the rich cheesecake.
- Layered Cheesecake: Create layers of red velvet and plain cheesecake for a stunning visual effect.
Make Ahead and Storage Tips
This cheesecake can be made ahead of time, making it a perfect choice for busy holiday seasons. Here’s how to store and prepare it:
- Make Ahead: You can prepare the cheesecake a day or two in advance. Just ensure it’s tightly covered in the refrigerator.
- Freezing: Wrap slices in plastic wrap and store in an airtight container for up to three months. Thaw in the fridge overnight before serving.
- Serving Suggestions: Pair your cheesecake with a warm cup of coffee or hot cocoa for a cozy treat. It also pairs beautifully with a side of fresh fruit.
Frequently Asked Questions
Here are some common questions about making this scrumptious cheesecake:
- Can I use low-fat cream cheese? Yes, but the texture may be slightly different. Look for a brand that is labeled as a “baking cream cheese” for best results.
- How do I know when my cheesecake is done? It should be set around the edges but slightly jiggly in the center. It will firm up as it cools.
- Can I use a different crust? Absolutely! A graham cracker crust or a nut-based crust can add a different flavor profile.
- What can I do if my cheesecake cracks? Serve it with a topping like whipped cream or fruit to cover any imperfections, or enjoy it as is—flavor is what matters!
- How long can I keep leftovers? Store covered in the refrigerator for up to five days.
- Can I use a different food coloring? Yes, gel food coloring works best for vibrant results, but feel free to experiment.
- What’s the best way to slice cheesecake? Use a hot, wet knife for clean cuts. Wipe the knife between slices for the best presentation.
- Is this cheesecake gluten-free? If you use gluten-free cookies for the crust, it can be made gluten-free!
Nutritional Tips and Dietary Adaptations
This cheesecake can be adapted to fit various dietary needs:
- Gluten-Free: Use gluten-free cookies for the crust.
- Dairy-Free: Substitute cream cheese with a dairy-free alternative, and use coconut cream for the whipped topping.
- Reduced Sugar: Use a sugar substitute or reduce the sugar amount to suit your dietary preferences.
Essential Equipment for Success
To ensure your baking process is smooth, here are some recommended tools:
- Springform Pan: Essential for easy removal of your cheesecake without damaging its shape.
- Mixing Bowls: A set of mixing bowls in various sizes for preparing different components.
- Electric Mixer: A hand or stand mixer simplifies the process of achieving a creamy batter.
- Measuring Cups and Spoons: Accurate measurements are key to the success of your recipe.
Final Thoughts: A Slice of Love
As you prepare to bake this Christmas Red Velvet Cheesecake, remember that cooking is about more than just following a recipe; it’s about pouring your heart into every step. This cheesecake is a testament to love, family, and the joy of sharing good food with those who matter most. So roll up your sleeves, preheat that oven, and let’s create something delectable that will fill your home with the warmth of the holiday spirit. Happy baking!
Irresistibly Easy Christmas Red Velvet Cheesecake Recipe
Ingredients
Crust
- 24 cookies Oreo Cookies (Crushed)
- 1/2 cup Unsalted Butter (Melted)
Filling
- 16 oz Cream Cheese (Softened)
- 1 cup White Sugar (Adjust to taste)
- 1 cup Heavy Whipping Cream (Or Cool Whip)
- 1 tsp Vanilla Extract (Or peppermint extract)
- 1/4 cup Cocoa Powder (Adjust to taste)
- 1 tbsp Red Food Coloring (Adjust to desired shade)
Decorations
- 1/2 cup Christmas Sprinkles
- 1 cup Whipped Cream (Fresh or store-bought)
- 1/2 cup Mini Oreos (For decoration)
Instructions
- Combine crushed cookies and melted butter, then press into a springform pan to form the crust.
- Cream together cream cheese, sugar, vanilla, and cocoa powder until smooth.
- Add red food coloring and mix until evenly colored.
- Whip the heavy cream and fold into the cream cheese mixture.
- Pour filling over crust, top with whipped cream, sprinkles, and mini Oreos. Chill for at least 4 hours before serving.