
A Journey into Flavor: The Heart of Garlic Bread Sticks
There’s something enchanting about the smell of fresh bread wafting through the kitchen, isn’t there? These Garlic Bread Sticks are more than just a delightful addition to your meal; they are a warm embrace, a reminder of family gatherings, and a delicious way to share love with those around you. This cherished family recipe combines the rich aroma of garlic, the warmth of fresh herbs, and the buttery goodness that makes every bite feel like a hug from grandma. Ready to embark on this culinary adventure? Let’s dive into why you’ll absolutely adore making these garlic breadsticks!
Why You’ll Love This Recipe
Here are just a few reasons that will make you fall in love with this recipe:
- Quick and Easy: You can whip these up in about an hour, making them perfect for those spontaneous family dinners or when unexpected guests arrive.
- Heavenly Aroma: The combination of garlic and herbs fills your home with a comforting scent that beckons everyone to the kitchen.
- Customizable: With simple ingredient substitutions, you can tailor these breadsticks to suit your taste or dietary needs.
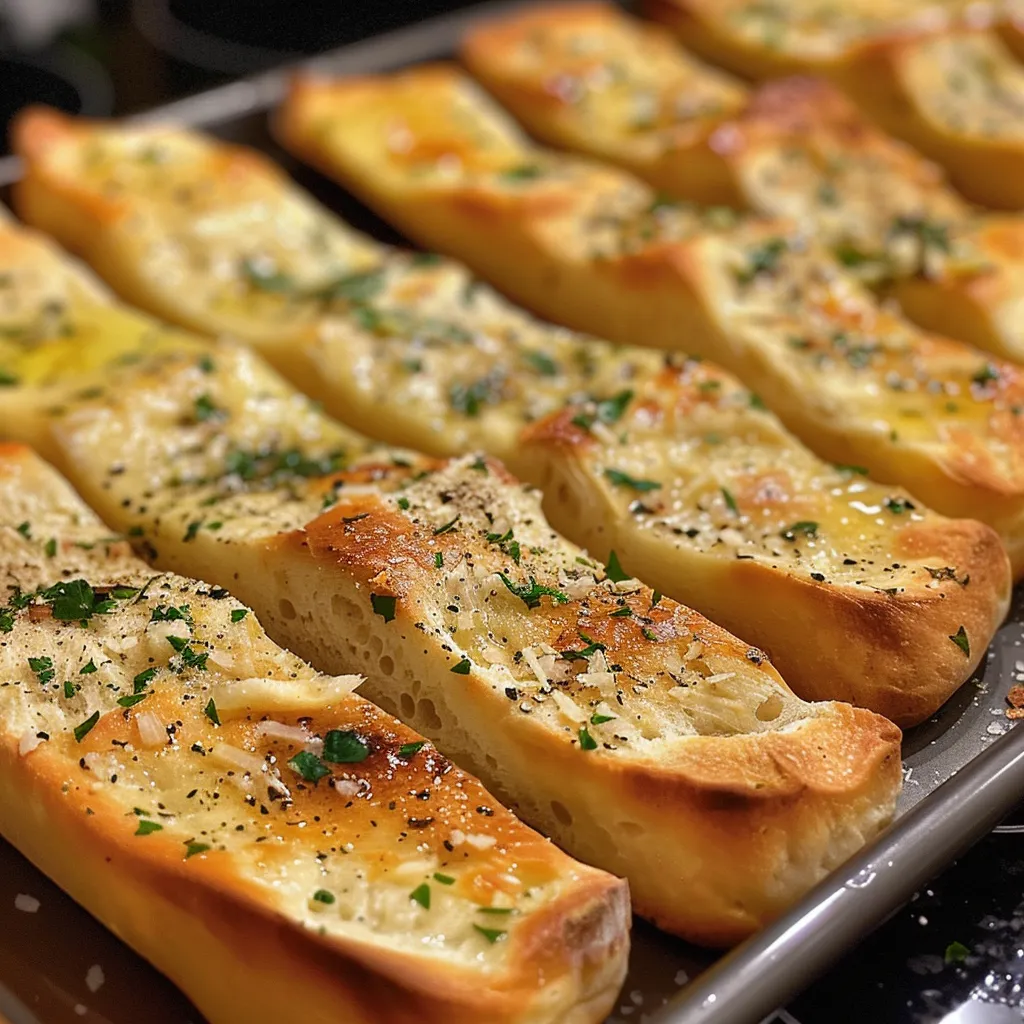
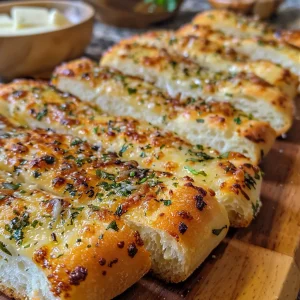
- Perfect Texture: These breadsticks achieve a delightful contrast with crispy golden edges and a soft, pillowy center.
- Family Bonding: Making these breadsticks is an opportunity to gather in the kitchen, share stories, and create lasting memories.
Ingredients Breakdown
Before we begin, let’s gather our ingredients. Here’s what you’ll need to create these delicious garlic breadsticks:
- 2 1/4 teaspoons active dry yeast: This is your leavening agent, ensuring your breadsticks rise perfectly.
- 1 cup warm water (about 43°C / 110°F): Helps activate the yeast; make sure it’s not too hot or too cold.
- 1 tablespoon granulated sugar: This feeds the yeast, helping it to bloom and create that fluffy texture.
- 2 tablespoons olive oil: Adds richness and flavor to the dough.
- 2 1/2 cups all-purpose flour: For structure; you can substitute with whole wheat if desired.
- 1 teaspoon fine salt: Enhances flavor; don’t skip this!
- 3 tablespoons unsalted butter, melted: Adds a wonderful layer of flavor and a golden finish.
- 3 cloves garlic, minced: The star of the show—fresh garlic delivers the best flavor.
- 2 tablespoons fresh parsley, finely chopped: Adds freshness and a pop of color.
- 1/2 teaspoon dried oregano: For that classic Italian flavor.
- 1/2 teaspoon dried basil: Complements the garlic beautifully.
- 1/2 teaspoon garlic powder: For an extra kick of garlic goodness.
- 1/2 teaspoon fine salt: A touch more for the garlic butter.
- 2 tablespoons grated Parmesan cheese: Adds a nutty, cheesy finish.
Pro Tips for Perfection
Here are some tips I’ve gathered over the years to ensure your garlic breadsticks turn out perfectly every time:
- Warm Water: Always check the temperature of your water. Too hot can kill the yeast, and too cold won’t activate it.
- Flour Measurement: Spoon and level your flour instead of scooping it directly from the bag to avoid using too much.
- Kneading: Don’t rush the kneading process; it’s essential for developing gluten, which gives your breadsticks structure.
- Rising Time: Let the dough rise in a warm place, away from drafts, for the best results.
- Butter Application: Brush the garlic butter on right after baking for maximum flavor absorption.
- Storage: These breadsticks are best enjoyed fresh, but they can be stored in an airtight container for a few days.
- Extra Garlic Butter: Make more garlic butter to serve on the side for dipping!
- Experiment with Herbs: Feel free to add other herbs like thyme or rosemary for a unique twist.
Common Mistakes and Troubleshooting
Even the best chefs make mistakes! Here’s how to avoid common pitfalls:
- Yeast Not Activating: If your yeast doesn’t foam after 10 minutes, it may be expired or the water was too hot/cold.
- Dough Too Sticky: If the dough is too sticky, gradually add a bit more flour while kneading.
- Overbaking: Keep an eye on the breadsticks in the oven; they should be golden brown but not dark.
- Flavorless Breadsticks: Ensure you season both the dough and garlic butter for maximum flavor.
Variations to Try
These garlic breadsticks are versatile! Here are some fun variations to consider:
- Cheesy Garlic Breadsticks: Add shredded mozzarella on top before baking for a gooey, cheesy twist.
- Herbed Breadsticks: Mix in different herbs like rosemary or thyme into the dough for an aromatic touch.
- Spicy Garlic Breadsticks: Add a pinch of red pepper flakes to the garlic butter for a kick.
- Stuffed Breadsticks: Fill the dough with mozzarella and pepperoni before shaping for a fun surprise.
Storage and Make-Ahead Instructions
These breadsticks are best enjoyed fresh, but you can prepare ahead of time:
- Make-Ahead: Prepare the dough and let it rise, then punch it down and refrigerate it overnight. Shape and bake the next day.
- Storing Leftovers: Place cooled breadsticks in an airtight container in the fridge for up to three days.
- Freezing: Freeze baked breadsticks in a single layer, then transfer to a bag. Reheat in the oven to restore crispness.
Frequently Asked Questions
Here are some common questions about making garlic breadsticks:
- Can I use whole wheat flour?: Yes, whole wheat flour can be used, but you may need to adjust the liquid slightly.
- What if I don’t have active dry yeast?: You can use instant yeast; there’s no need to proof it first.
- Can I make these gluten-free?: Absolutely! Substitute with a gluten-free flour blend and add xanthan gum.
- How do I know when the breadsticks are done?: They should be golden brown and sound hollow when tapped on the bottom.
- Can I add cheese to the dough?: Yes, shredded cheese can be added to the dough for extra flavor.
- What can I serve with these breadsticks?: They pair wonderfully with soups, salads, pasta, or can be enjoyed on their own with marinara sauce.
- Are these breadsticks suitable for freezing?: Yes, they freeze well and can be reheated in the oven.
- Can I use garlic powder instead of fresh garlic?: Yes, but fresh garlic gives a more robust flavor.
Nutritional Tips and Dietary Adaptations
For those watching their diet, here are some considerations:
- Lower-Carb Option: Substitute with a low-carb flour for a keto-friendly version.
- Dairy-Free: Use dairy-free butter and omit the Parmesan cheese.
- Vegetarian: This recipe is naturally vegetarian, making it suitable for many dietary preferences.
Equipment Recommendations
To successfully make these garlic breadsticks, you’ll need:
- Mixing Bowl: For combining ingredients and kneading the dough.
- Wooden Spoon: A sturdy spoon for mixing the dough.
- Baking Sheet: To bake your delicious breadsticks evenly.
- Parchment Paper: To prevent sticking and for easy cleanup.
- Kitchen Towel: To cover the dough while it rises.
Serving Suggestions
These garlic breadsticks can elevate any meal. Here are some ideas:
- With Pasta: Serve alongside your favorite spaghetti or lasagna for a traditional Italian meal.
- As Appetizers: Pair with marinara sauce or a cheesy dip for a delightful starter.
- In Soups: Perfect for dipping in hearty soups or stews.
- As Snacks: Enjoy them on their own for a comforting snack anytime.
Final Thoughts
Making garlic breadsticks is more than just a cooking task; it’s a way to create warmth and connection in your home. These breadsticks are sure to become a beloved staple, bringing joy and flavor to your table. So gather your loved ones, roll up your sleeves, and let’s make some memories together. Happy baking!
Garlic Bread Sticks
Ingredients
Yeast and liquids
- 2 1/4 teaspoon active dry yeast
- 1 cup warm water about 43°C / 110°F
- 1 tablespoon granulated sugar
- 2 tablespoon olive oil
Dough
- 2 1/2 cup all-purpose flour
- 1 teaspoon fine salt
Garlic Butter
- 3 tablespoon unsalted butter melted
- 3 clove garlic minced
- 2 tablespoon fresh parsley finely chopped
- 1/2 teaspoon dried oregano
- 1/2 teaspoon dried basil
- 1/2 teaspoon garlic powder
- 1/2 teaspoon fine salt
- 2 tablespoon grated Parmesan cheese
Instructions
- Combine warm water, sugar, and yeast; let sit 5–10 min until foamy.
- Mix in olive oil, salt, and 2 cups flour; form shaggy dough.
- Add remaining flour and knead 5–7 min until smooth.
- Shape into a ball, let rise 1 hour until doubled.
- Roll dough into a rectangle, cut into 12 strips, and arrange on baking sheet.
- Preheat oven to 200°C, let bread sticks rest 10–15 min, then bake 12–15 min until golden. Brush with garlic butter and sprinkle Parmesan.