
Embrace the Tradition of Beef Yakiniku
Ah, the aroma of marinated beef sizzling on a hot grill—there’s nothing quite like it to bring back memories of family gatherings and warm evenings spent together. Beef Yakiniku, a Japanese favorite, is more than just a dish; it’s a celebration of flavors that unite loved ones around the table. Made with thinly sliced steak marinated to perfection, this dish is simple yet packed with flavor, making it a perfect choice for any occasion. Whether it’s a casual weeknight dinner or a festive gathering, this recipe will surely create cherished memories.
Why You’ll Love This Recipe
This Beef Yakiniku recipe stands out for many reasons:
- Family-friendly: Easy to prepare, this dish is perfect for children and adults alike, making it a great option for family dinners.
- Quick to cook: With a prep time of just 15 minutes and cooking time of around 10 minutes, you can enjoy a delicious meal in less than half an hour.
- Flavorful marinade: The marinade combines soy sauce, gochujang, and brown sugar, resulting in a sweet and savory flavor that caramelizes beautifully when cooked.
- Customizable: You can easily adjust the spice level and ingredients based on your family’s preferences.
- Perfect for meal prep: The beef can be marinated ahead of time, making weeknight dinners stress-free.
Ingredients Breakdown
Here’s what you need to make this delightful Beef Yakiniku:
- Steak: 750 g (1.65 lbs) flank or skirt steak, very thinly sliced against the grain.
- Marinade: 80 ml (⅓ cup) low-sodium light soy sauce, ½ tbsp gochujang (Korean red chili paste), 1 tbsp mirin, 2 tsp minced ginger, ½ tsp garlic powder or 1 tsp garlic paste, 1 tbsp sesame oil, 1 tbsp neutral oil (e.g., avocado or rapeseed), and 4 tbsp light brown sugar.
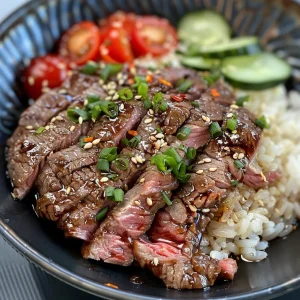
- To serve: Sesame seeds, boiled rice, and chopped cucumber and tomato.
**Substitutions:** If you can’t find flank or skirt steak, try using sirloin or ribeye. For a gluten-free option, substitute soy sauce with tamari. Use honey instead of brown sugar for a touch of sweetness.
Pro Tips for Perfect Yakiniku

To ensure your Beef Yakiniku turns out perfectly every time, here are some expert insights:
- Slice against the grain: This ensures the beef is tender and easy to chew.
- Marinate longer: For deeper flavor, marinate the steak for up to 4 hours, or even overnight if time allows.
- High heat cooking: A hot pan or grill is crucial for achieving that delicious caramelization.
- Batch cooking: Cook in batches to avoid steaming the meat; this keeps it tender and juicy.
- Fresh ingredients: Use fresh ginger and garlic for a more vibrant flavor.
- Experiment with veggies: Add bell peppers, mushrooms, or zucchini to the grill for a colorful meal.
- Let it rest: Allow the cooked beef to rest for a few minutes before serving to let the juices redistribute.
- Garnish generously: A sprinkle of sesame seeds adds a delightful crunch and visual appeal.
Common Mistakes & Troubleshooting
Here are a few common pitfalls and how to avoid them:
- Over-marinating: Marinating for too long can make the beef mushy. Stick to the recommended time.
- Low cooking temperature: Cooking at low heat results in tough meat. Ensure your pan is hot before adding the beef.
- Skipping the resting step: Cutting into the beef immediately after cooking can cause juices to run out. Let it rest for a few minutes.
Variations of Beef Yakiniku
Feel free to get creative! Here are some variations to try:
- Spicy Yakiniku: Add more gochujang or a splash of sriracha to the marinade for an extra kick.
- Vegetarian Yakiniku: Substitute the beef with thinly sliced eggplant or portobello mushrooms, marinated in the same sauce.
- Yakiniku Tacos: Use the cooked beef as a filling for soft tortillas topped with fresh salsa and avocado.
- Beef Yakiniku Rice Bowl: Serve the beef over a bed of rice topped with a fried egg and scallions for a hearty meal.
Make-Ahead & Storage Instructions
You can easily prepare this dish in advance:
- Marinate the beef: Prepare the marinade and marinate the beef up to 4 hours ahead or overnight for the best flavor.
- Cooking ahead: Cook the beef in advance and store it in an airtight container in the fridge for up to 3 days.
- Freezing: You can freeze the marinated beef for up to 3 months. Thaw in the refrigerator before cooking.
Frequently Asked Questions
- Can I use a different cut of beef? Yes, any tender cut of beef will work, but flank and skirt are ideal for their flavor and tenderness.
- What can I serve with Beef Yakiniku? Serve it with boiled rice, fresh vegetables, and a light salad for a complete meal.
- Is Beef Yakiniku spicy? The spice level can be adjusted based on the amount of gochujang used in the marinade.
- Can I make this dish in advance? Yes, marinate the beef ahead of time and cook it just before serving.
- How do I know when the beef is done? The beef should be browned and slightly crispy but not overcooked. It typically takes about 5-7 minutes.
- What type of rice is best? Short-grain rice or jasmine rice pairs beautifully with Beef Yakiniku.
- Can I use a grill instead of a pan? Absolutely! A grill adds a lovely smoky flavor. Just ensure it’s hot before adding the beef.
- How should I store leftovers? Keep leftovers in an airtight container in the refrigerator for up to 3 days.
Nutritional Tips & Dietary Adaptations
This dish can easily be tailored to fit various dietary needs:
- Low-carb: Serve with cauliflower rice instead of traditional rice.
- Gluten-free: Use tamari instead of soy sauce to accommodate gluten sensitivities.
- Low-sugar: Reduce the amount of brown sugar or substitute with a sugar alternative.
Essential Equipment for Cooking Beef Yakiniku
To make your cooking experience seamless, here’s what you’ll need:
- Wok or cast-iron skillet: Ideal for high-heat cooking and achieving that perfect sear.
- Mixing bowl: For marinating the beef.
- Spatula: To stir the beef while cooking.
- Serving bowl: Keep your cooked beef warm while finishing the next batch.
Serving Suggestions for a Memorable Meal
Make your Beef Yakiniku meal unforgettable:
- Garnish: Top the beef with sesame seeds and chopped green onions for added flavor and color.
- Fresh sides: Serve with a side of pickled vegetables or a refreshing cucumber salad.
- Perfect pairing: A light Japanese beer or a cup of warm sake enhances the dining experience.
Conclusion
Cooking Beef Yakiniku is not just about making a meal; it’s about creating a moment to share with those you love. With its delightful flavors and simple preparation, this dish can become a beloved staple in your home, just as it is in mine. As you gather around the table, remember that the heart of cooking lies in the love and memories we create. So, let’s fire up that grill, savor every bite, and make memories that will last a lifetime.
Beef Yakiniku
Ingredients
Steak
- 750 g flank or skirt steak, very thinly sliced against the grain
Marinade
- 80 ml low-sodium light soy sauce
- 0.5 tbsp gochujang (Korean red chili paste)
- 1 tbsp mirin
- 2 tsp minced ginger
- 0.5 tsp garlic powder or 1 tsp garlic paste
- 1 tbsp sesame oil
- 1 tbsp neutral oil (e.g., avocado or rapeseed)
- 4 tbsp light brown sugar
To Serve
- Sesame seeds
- Boiled rice
- Chopped cucumber and tomato
Instructions
- Whisk together soy sauce, gochujang, mirin, ginger, garlic, sesame oil, neutral oil, and brown sugar to make the marinade.
- Add sliced beef to the marinade, coat well, cover, and refrigerate for 2 hours.
- Preheat a wok over high heat. Sear half of the beef for 3 minutes, then stir and cook for 2-3 minutes until browned. Repeat with remaining beef.
- Transfer cooked beef to a warm bowl, sprinkle with sesame seeds, and serve with rice and fresh vegetables.