
A Heartfelt Journey to Rustic Garlic Rosemary Skillet Bread
Welcome to my humble kitchen, where the aroma of fresh bread fills the air, wrapping around you like a warm hug. Today, we’re diving into the delightful world of Rustic Garlic Rosemary Skillet Bread, a recipe that not only nourishes the body but also the soul. This bread, infused with the fragrant warmth of garlic and the earthy touch of rosemary, is perfect for sharing with loved ones, creating cherished memories, and celebrating the simple joys of life.
In the following sections, we’ll explore the ingredients, step-by-step instructions, and tips that make this bread not just a recipe, but a heartfelt experience. So, let’s gather our ingredients and get started on our baking journey!
Why You’ll Love This Recipe
- Easy to Make: With just a few simple ingredients, this rustic bread comes together effortlessly, even for beginners.
- Rich Flavor: The combination of sautéed garlic and fresh rosemary infuses the bread with an irresistible aroma, filling your kitchen with warmth.
- Versatile: Whether you’re serving it alongside a hearty soup or as a base for bruschetta, this skillet bread complements any meal beautifully.
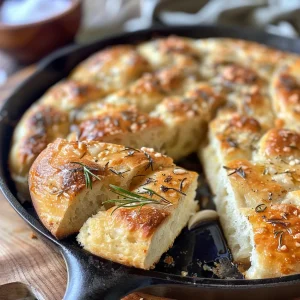
- Perfect Texture: The crust is golden and crispy while the inside remains soft and fluffy, creating a delightful contrast in every bite.
- Great for Sharing: This bread is perfect for gatherings. Your friends and family will love tearing into it together, making it a communal experience.
Ingredients You’ll Need
Let’s gather our ingredients! Here’s what you’ll need to whip up this delightful garlic rosemary skillet bread:
- 2 cups (240 g) all-purpose flour: The foundation of our bread, providing a tender crumb.
- 1 tsp salt: Enhances the flavor, making each bite more satisfying.
- 1 tsp instant yeast: The magic ingredient that helps our dough rise beautifully.
- 1 cup (240 ml) warm water: Activates the yeast; ensure it’s warm, not hot.
- 2 tbsp olive oil: Adds richness and moisture to our bread.
- 4 cloves garlic, minced: Infuses the bread with a warm, savory flavor.
- 2 tbsp fresh rosemary, chopped: Adds a fragrant, earthy note that complements the garlic.
If you’re looking for substitutions, here are a few suggestions:
- Flour: You can use bread flour for a chewier texture or whole wheat flour for a heartier bread.
- Yeast: Active dry yeast can be used in place of instant yeast; just activate it in warm water before mixing.
- Olive Oil: Any neutral oil, like avocado or canola oil, will work in a pinch.
How to Make Rustic Garlic Rosemary Skillet Bread

Now, let’s roll up our sleeves and get baking! Follow these easy steps to create your very own rustic garlic rosemary skillet bread.
Step 1: Mix the Dry Ingredients
In a large mixing bowl, combine the flour, salt, and instant yeast using a whisk. This helps to evenly distribute the yeast and salt, ensuring a perfect rise.
Step 2: Add Wet Ingredients
Warm the water until it feels comfortably warm to the touch, then slowly pour it into the flour mixture. Stir until a shaggy dough forms, bringing everything together.
Step 3: First Rise
Cover the bowl with a damp kitchen towel or plastic wrap. Let it rise in a warm place for about 1 to 2 hours, or until it has roughly doubled in size. This is where the magic happens!
Step 4: Prepare the Garlic and Rosemary Infusion
In a small skillet, heat the olive oil over medium heat. Add the minced garlic and sauté until fragrant and golden, about 2 minutes. Stir in the chopped rosemary and let it cool slightly.
Step 5: Incorporate the Flavors
Once the dough has risen, turn it out onto a floured surface. Shape it into a rough ball and pour the cooled garlic-rosemary infusion over the top. Fold the dough to incorporate those lovely flavors.
Step 6: Shape and Second Rise
Shape the dough into a round loaf and place it in a well-oiled cast-iron skillet. Cover and let it rest for another 30 minutes for a second rise. This allows the flavors to deepen and the texture to improve.
Step 7: Preheat the Oven
During the last 10 minutes of the second rise, preheat your oven to 400°F (200°C). Get that oven nice and hot for a lovely crust!
Step 8: Bake the Bread
Bake the bread for 25-30 minutes or until it’s golden brown and sounds hollow when tapped. The smell will be heavenly, and you’ll be counting down the minutes until you can slice into it.
Step 9: Cool and Serve
Allow the bread to cool in the skillet for a few minutes before transferring it to a wire rack. Slice and serve warm, ideally with a drizzle of olive oil or a spread of your favorite butter.
Pro Tips for Perfecting Your Bread
- Check Your Yeast: Always ensure your yeast is fresh for the best rise. If you’re unsure, proof it in warm water with a bit of sugar before using.
- Warm Environment: If your kitchen is cold, create a warm spot by turning on your oven for a minute, then turning it off and placing the dough inside.
- Don’t Rush the Rise: Patience is key! Letting the dough rise until it has doubled in size results in a lighter, fluffier loaf.
- Experiment with Flavors: Feel free to add herbs or spices of your choice to the dough for a custom flavor profile.
- Use a Cast Iron Skillet: It retains heat beautifully, giving your bread a perfect crust.
- Monitor Baking Time: Oven temperatures can vary, so keep an eye on the bread as it bakes to avoid over-browning.
- Cool Completely: Allow the bread to cool completely before slicing to maintain its texture.
- Store Properly: To keep the crust crispy, store leftover bread in a paper bag, not plastic.
Common Mistakes and Troubleshooting
Even the best bakers face challenges! Here are some common pitfalls and how to avoid them:
- Dough Too Sticky: If the dough is too sticky to handle, add a little more flour, a tablespoon at a time, until it’s manageable.
- Dough Not Rising: This can happen if the yeast is expired or if the environment is too cool. Make sure to use fresh yeast and provide a warm setting.
- Dense Bread: This usually results from not enough rising time or too much flour. Be patient and ensure a proper ratio of wet to dry ingredients.
- Overbaked Bread: If the crust is too dark, consider lowering the oven temperature slightly and extending the baking time for a more even bake.
Variations to Try
While this recipe is delightful as it is, you might want to try different spins on it:
- Cheesy Garlic Rosemary Bread: Add shredded cheese, like mozzarella or cheddar, to the dough for a cheesy twist.
- Herb Blend: Experiment with different herbs like thyme, oregano, or basil for varied flavors.
- Roasted Garlic Variation: Use roasted garlic instead of fresh for a sweeter, more mellow flavor.
- Olive Tapenade Addition: Fold in some olive tapenade for a Mediterranean flair that’s bursting with flavor.
Storage and Make-Ahead Instructions
This rustic garlic rosemary skillet bread is best enjoyed fresh, but it can be stored and enjoyed later:
- Room Temperature: Store the bread in a paper bag at room temperature for up to 2 days.
- Freezing: Slice and freeze the bread in an airtight container for up to 3 months. Thaw at room temperature before enjoying.
- Make Ahead: You can prepare the dough ahead of time and let it rise in the fridge overnight. Just bring it to room temperature before shaping and baking.
Frequently Asked Questions
- Can I use whole wheat flour? Yes, whole wheat flour can be used for a heartier texture, but it may require a bit more water.
- How can I tell when the bread is done? The bread should be golden brown and sound hollow when tapped on the bottom.
- Can I add other flavors? Absolutely! Feel free to experiment with different herbs or spices.
- What should I serve with this bread? It pairs wonderfully with soups, salads, or as a side to any meal.
- How long does the bread last? It’s best eaten fresh but can be kept in a paper bag for up to 2 days.
- Can I make this recipe gluten-free? Yes, you can substitute a gluten-free all-purpose flour blend, but the texture may vary.
- What if my dough doesn’t rise? Ensure your yeast is fresh and the environment is warm; you may need to let it rise longer.
- Can I bake this bread in a regular pan? Yes, you can use a regular loaf pan, but the baking time may vary.
Nutritional Tips and Dietary Adaptations
This rustic garlic rosemary skillet bread can be adapted to suit various dietary needs:
- Gluten-Free: Use a gluten-free flour blend and ensure all other ingredients are gluten-free.
- Vegan: This recipe is naturally vegan, made without dairy or eggs.
- Low-Sodium: Reduce the salt to suit your dietary requirements.
Equipment Recommendations
To bake your rustic garlic rosemary skillet bread, here’s what you’ll need:
- Cast Iron Skillet: Perfect for even heat distribution and creating a beautiful crust.
- Mixing Bowl: A large bowl for mixing and rising your dough.
- Whisk: For incorporating dry ingredients smoothly.
- Kitchen Towel: To cover your dough during the rising process.
Serving Suggestions
Enjoy your rustic garlic rosemary skillet bread warm with:
- Balsamic Vinegar and Olive Oil: A simple yet elegant dip to complement the bread.
- Herbed Butter: Spread some herbed butter for an extra layer of flavor.
- Soups and Stews: Perfect alongside a hearty bowl of your favorite soup.
This rustic garlic rosemary skillet bread is more than just a recipe; it’s a way to connect with loved ones and create lasting memories. Its warm, inviting flavors will fill your home with love and laughter. So gather your ingredients, invite your family to the kitchen, and let’s create something beautiful together. Happy baking!
Rustic Garlic Rosemary Skillet Bread
Ingredients
Dry ingredients
- 2 cups all-purpose flour
- 1 tsp salt
- 1 tsp instant yeast
Wet ingredients
- 1 cup warm water
- 2 tbsp olive oil
- 4 cloves garlic, minced
- 2 tbsp fresh rosemary, chopped
Instructions
- Mix flour, salt, and yeast in a bowl.
- Add warm water, stir to form dough, then let rise 1-2 hours.
- Sauté garlic in olive oil until fragrant, then add rosemary and cool.
- Shape dough, pour garlic-rosemary infusion over, fold in flavors, and let rise 30 minutes.
- Preheat oven to 400°F (200°C), bake for 25-30 minutes until golden.
- Cool briefly, then slice and serve warm.