
Welcome to the Heart of Baking: Crafting Sweet Buns at Home
There’s something truly magical about baking a loaf of bread or a batch of sweet buns at home. The warm aroma wafting through the kitchen, the anticipation of that first bite, and the joy of sharing your creation with loved ones are all part of the experience. This Basic Sweet Buns Recipe is not just a recipe; it’s an invitation to create cherished memories around your family table. With simple ingredients and a straightforward process, you’ll find that this recipe is perfect for both beginners and seasoned bakers alike.
In this guide, we’ll dive deep into the art of making sweet buns, exploring everything from ingredient breakdowns to troubleshooting tips. Whether you’re hosting a family gathering or simply treating yourself, these buns are bound to warm hearts and fill bellies. So, roll up your sleeves, and let’s get baking!
Why You’ll Love This Recipe
- Perfect for Beginners: This recipe is designed with simple techniques, making it easy for anyone to follow and succeed on their first try.
- Warm, Comforting Flavor: The combination of sweet milk and butter creates a rich, comforting flavor that will remind you of home.
- Versatile and Customizable: You can adapt this recipe by adding spices, fruits, or glazes to suit your taste.
- Great for Sharing: These buns are perfect for gatherings, making them a delightful treat to share with family and friends.
- Easy to Store: Leftovers can be easily stored for later enjoyment, ensuring that the love continues long after baking.
Ingredient Breakdown
Let’s take a closer look at the ingredients that come together to create these delightful sweet buns:
- Active Dry Yeast: Essential for making the dough rise, it creates that fluffy texture we all love. If you’re out of yeast, you can substitute with instant yeast at a 1:1 ratio.
- Warm Water: Activates the yeast—make sure it’s between 105-115℉ for optimal proofing.
- Warm Milk: Adds richness and moisture to the dough. If you prefer a dairy-free option, almond or oat milk works well too.
- Large Eggs: Provides structure and moisture. For a vegan alternative, you can use flax eggs (1 tablespoon ground flaxseed mixed with 2.5 tablespoons water per egg).
- Melted Butter: Enhances flavor and tenderness. Coconut oil can be used as a substitute for a dairy-free version.
- Salt: Balances the sweetness and enhances overall flavor.
- Sugar: The sweet component that gives these buns their name, it also aids in browning. Honey or maple syrup can be used as alternatives.
- All-Purpose Flour: The backbone of the recipe. For a lighter bun, consider using bread flour.
- Egg Wash: A mixture of egg and milk brushed on top before baking gives the buns a beautiful golden crust.
Step-By-Step Process
Now that we have our ingredients ready, let’s get into the step-by-step process of making these delightful sweet buns:
- Proof the Yeast: In the bowl of a stand mixer, combine the warm water and sprinkle the yeast with 1 teaspoon of sugar. Let it sit for about 5 minutes until it becomes foamy.
- Add the Other Dough Ingredients: Add the warm milk, eggs, salt, remaining sugar, and melted butter to the yeast mixture. Stir gently until blended.
- Add Flour Gradually: Start adding 3 cups of flour, one cup at a time, mixing with a wooden spoon after each addition until a shaggy dough forms. Then add the remaining half cup of flour.
- Knead the Dough: Attach the dough hook to your mixer and knead the dough on medium-high speed for about 5 minutes. Gradually sprinkle in the remaining ½ cup of flour, continuing to knead for an additional 7-10 minutes. The dough should be smooth and elastic.
- Let the Dough Rise: Form the dough into a ball and place it in a lightly greased bowl. Cover with a clean kitchen towel and allow it to rise until doubled in size, about 1 to 1½ hours.
- Shape the Dough: After rising, gently deflate the dough on a floured surface. Divide it into 16 equal portions and shape them into smooth balls, placing them in a parchment-lined 9×13 inch baking pan.
- Let the Shaped Dough Rise Again: Cover the pan loosely with a towel and let the buns rise again for 1 to 1½ hours until they are soft and puffy.
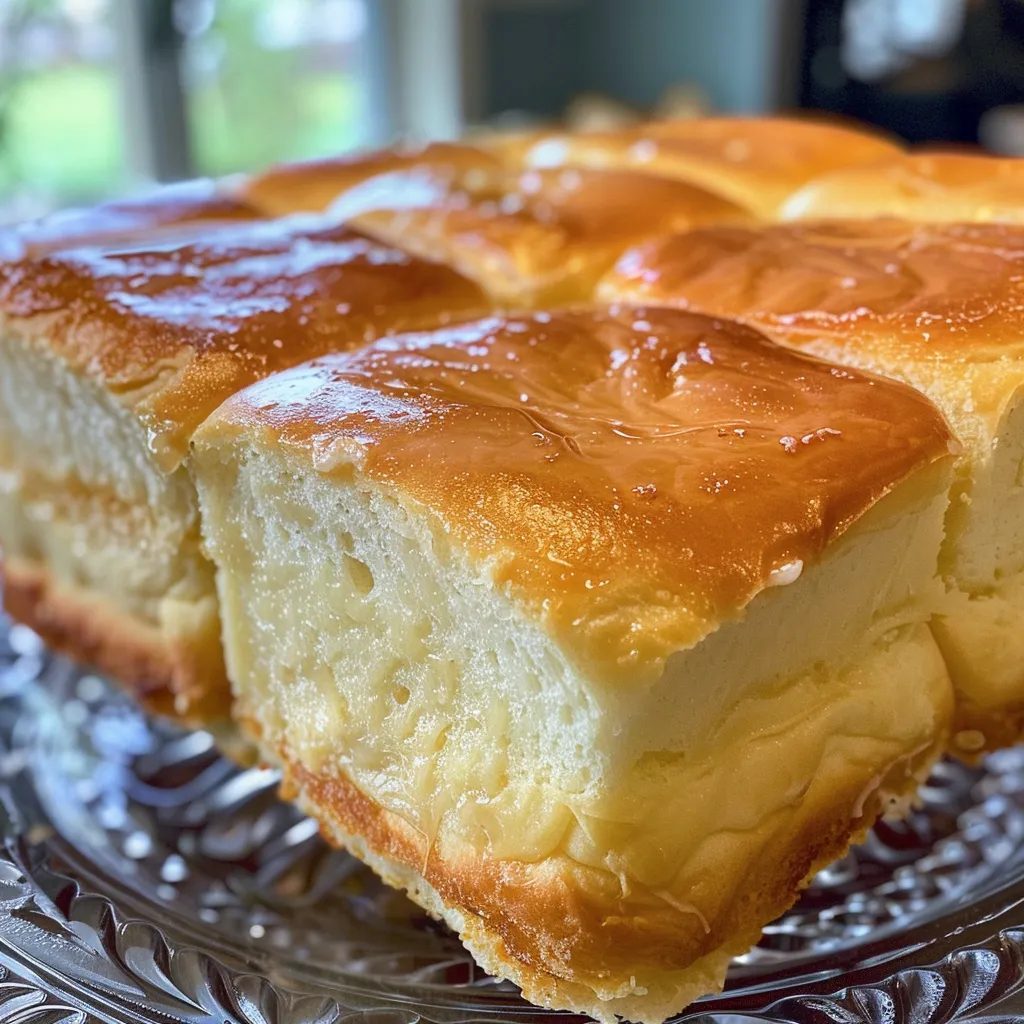
- Egg Wash: Preheat your oven to 350℉. Beat together the egg and 1 tablespoon of milk, then brush the tops of the buns with this mixture.
- Bake: Bake the buns for 15-20 minutes, or until the tops are lightly golden brown.
Pro Tips for Perfect Sweet Buns
- Temperature Matters: Ensure your liquids are at the right temperature to properly proof the yeast; too hot can kill it, while too cold can hinder its activation.
- Don’t Rush the Kneading: Proper kneading develops gluten, giving your buns their structure and chew. Take your time with this step.
- Watch the Rise: If your kitchen is cool, consider placing the dough in a slightly warm oven to encourage rising.
- Experiment with Flavors: Add vanilla extract, orange zest, or cinnamon to the dough for an extra layer of flavor.
- Check for Doneness: Buns are done when they’re golden on top and sound hollow when tapped on the bottom.
- Cool Before Storing: Allow buns to cool completely before storing to avoid moisture buildup, which can make them soggy.
- Serving Temperature: Sweet buns are best served warm. Consider reheating leftovers in the oven for a few minutes before serving.
- Be Creative with Toppings: Try drizzling a simple icing made of powdered sugar and milk over baked buns for an added treat.
Common Mistakes and Troubleshooting
Even the most seasoned bakers encounter challenges. Here are some common mistakes to watch for and how to troubleshoot them:
- Dough Not Rising: This can be due to old yeast or incorrect temperatures. Always check your yeast’s expiration date and ensure your liquids are at the right temperature.
- Dense Buns: If your buns turn out dense, it could be from over-kneading or not allowing enough rising time. Ensure you’re following the timing closely for rises.
- Burnt Tops: If the tops are browning too quickly, cover them loosely with aluminum foil midway through baking.
- Sticky Dough: If your dough is too sticky to handle, gradually add a bit more flour while kneading until it reaches the right consistency.
Delicious Variations
Here are some fun variations to try with this basic sweet buns recipe:
- Chocolate Chip Sweet Buns: Fold in chocolate chips before shaping the dough for a sweet treat.
- Cinnamon Roll Buns: Sprinkle cinnamon and sugar between the dough layers before shaping for a delightful twist.
- Fruit-Filled Buns: Add fruit preserves or fresh berries in the center of each dough ball before baking.
- Glazed Lemon Buns: Add lemon zest to the dough and top with a lemon glaze for a refreshing flavor.
Storage and Make-Ahead Instructions
These sweet buns are great for make-ahead baking:
- Storing Leftovers: Keep cooled buns in an airtight container at room temperature for up to 3 days. For longer storage, freeze them in a freezer-safe bag for up to 3 months.
- Making Ahead: You can prepare the dough and let it rise in the fridge overnight. The next day, shape and let it rise again before baking.
Frequently Asked Questions
Here are some common questions about making sweet buns:
- Can I use whole wheat flour? Yes, you can substitute whole wheat flour, but the texture may be denser.
- What’s the best way to warm milk? Gently heat it on the stove or in the microwave until warm, but not hot.
- What if my dough is too dry? Add a little more warm water, a tablespoon at a time, until it reaches the right consistency.
- Can I make these buns without eggs? Yes, you can use flax eggs or applesauce as substitutes for moisture and binding.
- What’s the best way to reheat leftovers? Warm buns in a 350℉ oven for about 5-10 minutes until heated through.
- Can I flavor the dough? Absolutely! Feel free to add vanilla, almond extract, or citrus zest to enhance the flavor.
- How do I know when the buns are done? They should be golden brown on top and sound hollow when tapped on the bottom.
- Can I freeze the dough? Yes, you can freeze the shaped dough before the second rise. Just thaw and let it rise again before baking.
Nutritional Tips and Dietary Adaptations
This sweet bun recipe can be adapted to fit various dietary needs:
- Gluten-Free Option: Use a gluten-free flour blend suitable for baking to create a gluten-free version.
- Lower Sugar Alternative: Reduce the sugar or substitute with a sugar alternative to make it a healthier treat.
- Dairy-Free Version: Substitute all dairy ingredients with plant-based alternatives.
Essential Equipment Recommendations
Having the right tools can make your baking process smoother:
- Stand Mixer: Makes kneading the dough easier; a hand mixer can work too, but it may take longer.
- Dough Scraper: Helps in handling the dough and keeping your workspace clean.
- Baking Pan: A 9×13 inch pan is perfect for baking these sweet buns evenly.
- Kitchen Thermometer: For checking the temperature of liquids to ensure proper yeast activation.
Serving Suggestions
These sweet buns can be enjoyed in various delightful ways:
- Serve warm with a pat of butter for a classic treat.
- Pair with your favorite jam or preserves for a sweet breakfast.
- Top with a simple glaze made from powdered sugar and milk for a festive touch.
Now that you have all the knowledge and tools to craft the perfect sweet buns, it’s time to fill your home with warmth and love. Remember, baking is not just about following a recipe—it’s about creating moments that you’ll cherish forever. So gather your loved ones, share stories, and enjoy the sweet rewards of your hard work!

Basic Sweet Buns Recipe
Ingredients
Yeast and Liquids
- 2.25 tsp active dry yeast
- 0.25 cup warm water (105-115℉)
- 0.75 cup warm milk
- 2 large eggs
- 0.25 cup butter (melted)
- 1 tsp salt
- 0.5 cup sugar
- 4 cups all-purpose flour
- 1 large egg
- 1 tbsp milk
Instructions
- Activate yeast by mixing warm water, yeast, and a teaspoon of sugar; let sit until foamy.
- Add warm milk, eggs, salt, remaining sugar, and melted butter; stir until combined.
- Gradually add flour, stirring until a shaggy dough forms; knead with a mixer for 12-15 minutes, adding flour as needed.
- Let dough rise in a greased bowl, covered, until doubled in size (~1-1.5 hours).
- Divide dough into 16 balls, place on parchment-lined pan, and let rise until puffy (~1 hour).
- Brush buns with egg wash, then bake at 350℉ (175℃) for 15-20 minutes until golden.