
Discover the Joy of No-Bake Protein Balls
In a world where life often feels rushed, it’s a true blessing to find a recipe that not only nourishes the body but also warms the heart. Welcome to my kitchen, where we’ll dive into the delightful world of No-Bake Protein Balls. These little bites of joy are not just snacks; they are a celebration of wholesome ingredients and cherished memories. Made with love, these protein-packed treats are perfect for sharing with family and friends, ensuring that every bite is a reminder of home. Let’s explore why you’ll love making these protein balls!
Why You’ll Love This No-Bake Protein Balls Recipe
- Quick and Easy: With just a handful of ingredients, you can whip these up in no time. Perfect for busy days or unexpected guests!
- Healthy Ingredients: Packed with protein and fiber, these balls are a nourishing snack that keeps you energized throughout the day.
- Customizable: Tailor the flavors to your liking! Swap ingredients based on what you have at home or your personal taste.
- Kid-Friendly: These delicious bites are great for little hands. Encourage your kids to help make them—a fun way to bond in the kitchen!
- Perfect for Meal Prep: Make a batch ahead of time and store them for a quick grab-and-go snack during your busy week.
Ingredients for No-Bake Protein Balls
Now, let’s take a closer look at what goes into these wholesome protein balls. Here’s what you’ll need:
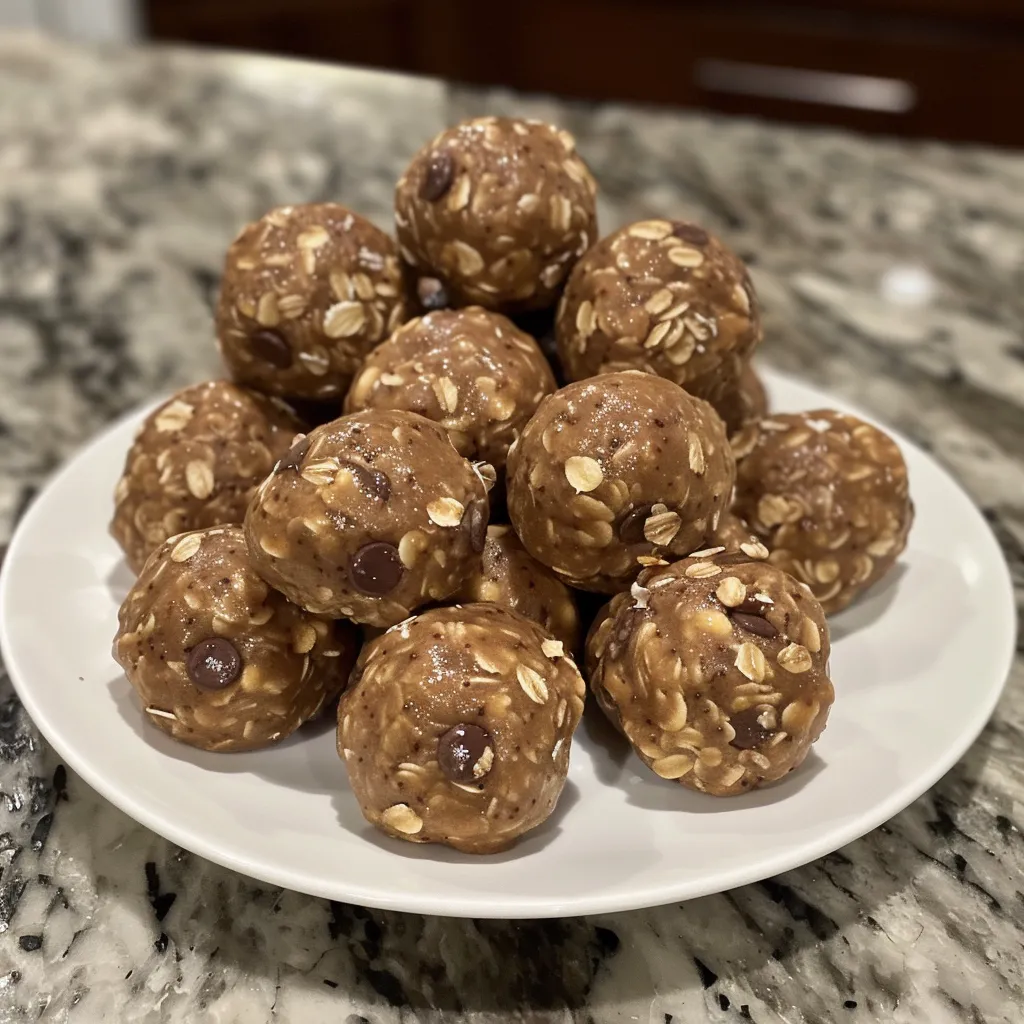
- 1 cup rolled oats: This classic ingredient provides a chewy texture and a hearty base. Feel free to use certified gluten-free oats if needed.
- 1/2 cup natural peanut butter: Creamy or crunchy, peanut butter adds richness and helps bind the ingredients together. You can also use almond butter or sunflower seed butter for a nut-free option.
- 1/3 cup honey or maple syrup: These natural sweeteners add a touch of sweetness and moisture. Choose maple syrup for a vegan version.
- 1/2 cup vanilla protein powder: This ingredient boosts the protein content, making these balls a great post-workout snack.
- 1/4 cup mini chocolate chips: For a hint of indulgence, these tiny morsels bring a delightful sweetness to each bite.
- 2 tablespoons chia seeds: Rich in omega-3 fatty acids, these seeds add a nutritional punch while helping to bind everything together.
- 1 teaspoon vanilla extract: A splash of vanilla enhances the flavor, making each bite taste like a treat.
- Pinch of salt: Just a little salt balances the sweetness and brings out the flavors beautifully.
Feel free to experiment with different nuts, seeds, or dried fruits based on your preference or what’s available in your pantry!
How to Make No-Bake Protein Balls: Step-by-Step Directions
Making these protein balls is as easy as pie. Follow these simple steps:
- In a large mixing bowl, combine the rolled oats, protein powder, chia seeds, and salt.
- Add the peanut butter, honey (or maple syrup), and vanilla extract to the dry ingredients.
- Mix everything together until a thick, sticky dough forms. If the mixture is too dry, add a little more honey or a splash of milk to achieve the right consistency.
- Fold in the mini chocolate chips until evenly distributed throughout the mixture.
- Scoop out tablespoon-sized portions and roll them into balls using your hands. Don’t worry about them being perfect; it’s the love that counts!
- Place the protein balls on a baking sheet lined with parchment paper and refrigerate for at least 30 minutes before serving. This helps them firm up and makes them easier to handle.
Pro Tips for Perfect No-Bake Protein Balls
- Consistency is Key: Make sure your mixture is sticky enough to hold together. Adjust with more peanut butter or sweetener as needed.
- Chill Time: Don’t skip the refrigeration step; it’s essential for the best texture.
- Mix It Up: Add in your favorite nuts, seeds, or dried fruits for extra flavor and nutrition.
- Portion Control: Use a cookie scoop for uniformity, making it easier to track servings.
- Experiment with Flavors: Try adding spices like cinnamon or cocoa powder to switch things up!
- Keep It Clean: Wet your hands slightly when rolling the balls to prevent sticking.
- Storage: Store the balls in an airtight container in the fridge for up to a week, or freeze for longer storage.
- Share the Love: These make perfect gifts! Package them in a mason jar with a pretty ribbon for a thoughtful present.
Common Mistakes and Troubleshooting
Even the best cooks make mistakes! Here are a few common pitfalls and how to avoid them:
- Too Dry: If your mixture is too crumbly, add more wet ingredients like peanut butter or honey until it holds together.
- Too Sticky: If your mixture is too sticky, try adding more oats or protein powder to balance the moisture.
- Not Chilling: Skipping the chill time leads to soft, messy bites. Always refrigerate for at least 30 minutes.
- Overmixing: Mixing too much can lead to tough protein balls. Just mix until combined.
Delicious Variations of No-Bake Protein Balls
Feeling adventurous? Here are some delightful variations to try:
- Chocolate Fudge Protein Balls: Add cocoa powder to the mix for a rich chocolate flavor.
- Trail Mix Protein Balls: Incorporate your favorite trail mix ingredients, like nuts, seeds, or dried fruit.
- Oatmeal Raisin Protein Balls: Swap chocolate chips for raisins and add a dash of cinnamon for a nostalgic touch.
- Coconut Almond Protein Balls: Use almond butter and roll the balls in shredded coconut for a tropical twist.
Storage and Make-Ahead Instructions
These No-Bake Protein Balls are perfect for meal prep! Here’s how to store them:
- Refrigeration: Keep the protein balls in an airtight container in the fridge for up to one week.
- Freezing: For longer storage, freeze the balls in a single layer on a baking sheet, then transfer to a freezer-safe container. They can last up to three months!
- Defrosting: When ready to enjoy, simply remove them from the freezer and let them sit at room temperature for about 10 minutes before serving.
Frequently Asked Questions (FAQ)
- Can I use a different type of nut butter? Yes, feel free to substitute with almond butter, cashew butter, or sunflower seed butter.
- How many protein balls does this recipe make? This recipe yields about 16 protein balls, depending on the size you make them.
- Can I make these vegan? Absolutely! Just use maple syrup instead of honey and any plant-based protein powder.
- What can I use instead of protein powder? You can use additional oats or nut flour, but the protein content will be lower.
- How do I know when they are done? Once chilled, they should hold their shape and feel firm to the touch.
- Can I add more ingredients? Yes, feel free to customize with additional seeds, nuts, or even spices!
- How long do they last in the fridge? They can last up to one week in an airtight container in the fridge.
- Can I make them without chocolate chips? Yes, you can omit the chocolate chips or replace them with dried fruit or nuts.
Nutrition Tips and Dietary Adaptations
These No-Bake Protein Balls are not just delicious; they can also fit various dietary needs:
- Gluten-Free: Use certified gluten-free oats to ensure these are safe for those with gluten sensitivities.
- Lower Sugar: Reduce the amount of honey or maple syrup, or substitute with a sugar-free sweetener.
- High-Protein: Opt for a protein powder with higher protein content for an extra boost.
- Nut-Free: Substitute nut butters with sunbutter or tahini for a nut-free option.
Essential Equipment for Making Protein Balls
To make the process smoother, here’s a quick list of essential kitchen tools:
- Mixing Bowl: A large bowl for combining all your ingredients.
- Measuring Cups and Spoons: Accurate measurements are key; ensure you have these handy!
- Cookie Scoop: For even portioning, a cookie scoop makes rolling balls a breeze.
- Parchment Paper: Line your baking sheet to prevent sticking and for easy cleanup.
Serving Suggestions for Your No-Bake Protein Balls
These protein balls are versatile and can be enjoyed in various ways:
- Snack Time: Perfect for a quick energy boost between meals.
- Post-Workout Fuel: A great high-protein recovery snack after your workouts.
- Breakfast On-the-Go: Grab a couple with your morning coffee for a hearty start to your day.
- Party Treats: Serve them at gatherings or potlucks for a healthy alternative to sugary snacks.
Conclusion: A Recipe Filled with Love
As we come to the end of our journey through the world of No-Bake Protein Balls, I hope you feel inspired to create these little treasures in your own kitchen. Remember, cooking is about sharing love and memories. These protein balls are not just a recipe; they embody the warmth of home and the joy of togetherness. So gather your loved ones, mix up a batch, and enjoy the delightful experience of cooking and sharing together. Happy cooking, my friends!
No-Bake Protein Balls
Ingredients
Dry ingredients
- 1 cup rolled oats
- 1/2 cup vanilla protein powder
- 2 tablespoons chia seeds
- 1/4 cup mini chocolate chips
Wet ingredients
- 1/2 cup natural peanut butter
- 1/3 cup honey or maple syrup
- 1 teaspoon vanilla extract
Optional
- Pinch salt
Instructions
- Mix dry ingredients in a bowl.
- Add wet ingredients and combine into a sticky dough.
- Form mixture into small balls and refrigerate for 30 minutes.