
Welcome to the Heart of Your Kitchen: Cheesy Garlic Rolls
There’s something truly magical about the aroma of fresh garlic butter wafting through your home, a warm invitation to gather around the table. Today, I want to share with you my cherished recipe for Cheesy Garlic Rolls, a delightful blend of tender dough, rich cheeses, and that signature garlic flavor that brings family together. Whether it’s a cozy family dinner or a festive gathering with friends, these rolls will evoke cherished memories and create new ones. Let’s dive into this comforting recipe that’s as much about love as it is about food.
Why You’ll Love This Recipe
These cheesy garlic rolls are not just another recipe; they are a celebration of flavor and tradition. Here are just a few reasons why you’ll adore making and sharing them:
- Incredible Flavor: The combination of roasted garlic and buttery cheese creates a flavor explosion that’s hard to resist.
- Easy to Make: With simple ingredients and straightforward steps, even novice cooks can master this recipe.
- Perfect for Any Occasion: Whether it’s a Sunday family dinner or a holiday feast, these rolls are a crowd-pleaser.
- Customizable: You can easily adjust the ingredients for different tastes, adding herbs or swapping out cheeses.
- Warm Memories: Each bite is a reminder of the warmth and love that comes from sharing food with family.
Ingredients You’ll Need
Before we roll up our sleeves, let’s gather everything we need. Here’s a detailed breakdown of the ingredients, along with some substitutions to make this recipe even more accessible:
- All-Purpose Flour: 3 1/2 cups (455g). This is the backbone of our dough. If you need a gluten-free option, try a 1:1 gluten-free flour blend.
- Active Dry Yeast: 2 1/4 teaspoons. Make sure it’s fresh for the best rise.
- Granulated Sugar: 1 tablespoon. This helps activate the yeast and balances flavors.
- Salt: 1 teaspoon. Essential for enhancing all the flavors.
- Large Egg: 1, at room temperature. This helps bind the dough.
- Whole Milk: 1 cup (240ml), warmed to 100-110°F. You can substitute with almond or oat milk for a dairy-free option.
- Unsalted Butter: 6 tablespoons (85g), softened. Adds richness to the dough.
- Room Temperature Butter: 1/2 cup, for the garlic mixture.
- Minced Garlic: 2 tablespoons. Fresh is best for flavor.
- Fresh Parsley: 2 tablespoons, finely chopped. This adds a fresh note and color.
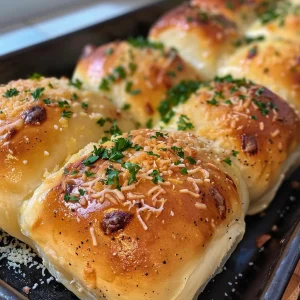
- Cheese: 3 cups mozzarella (shredded) and 1/2 cup parmesan (shredded). Feel free to mix and match with your favorite cheeses!
- Egg Wash: 1 large egg and 1 teaspoon water for a golden finish.
How to Make Cheesy Garlic Rolls

Now, let’s get cooking! Follow these steps to create your own buttery cheese garlic rolls. Each step is filled with love and care—just like Grandma taught me!
- Activate the Yeast: In the bowl of a stand mixer, mix together the warmed milk, sugar, and yeast. Cover the bowl and let it sit until foamy, about 8-10 minutes.
- Combine Ingredients: Once the yeast is ready, add the egg, flour, and salt to the bowl.
- Mix the Dough: With the dough hook attached, mix on low speed until a dough forms. Gradually mix in butter until fully incorporated, then increase speed to medium and knead for 5-6 minutes until smooth and slightly tacky.
- Let it Rise: Transfer the dough to a greased bowl, cover with plastic wrap, and let it rise in a warm area until doubled, about 60-90 minutes.
- Prepare the Garlic Butter: While the dough rises, combine the softened butter, minced garlic, parsley, salt, and pepper in a bowl. Mix well and set aside.
- Roll Out the Dough: Once risen, deflate the dough and let it rest for 5 minutes. On a floured surface, roll into a 12×16 inch rectangle and spread about 2/3 of the garlic butter on top.
- Add Cheese: Evenly sprinkle the mozzarella and parmesan cheese over the garlic butter.
- Shape the Rolls: Starting from the long end, roll the dough into a log and cut it into 8 equal pieces. Place them in a greased 9×13 inch baking pan and cover with plastic wrap to rise until doubled, about 25-35 minutes.
- Preheat the Oven: While the rolls are rising, preheat your oven to 350°F.
- Brush and Bake: Whisk the egg and water together to create an egg wash. Brush the rolls and bake for 25-30 minutes until golden brown. Tent with foil if they brown too quickly.
- Finish with Garlic Butter: Melt the remaining garlic butter and brush over the warm rolls just before serving. Enjoy the aroma!
Pro Tips for Success
To ensure your cheesy garlic rolls turn out perfectly every time, keep these expert tips in mind:
- Measure Accurately: Using a kitchen scale can help ensure precise measurements for the best results.
- Room Temperature Ingredients: Make sure your eggs and butter are at room temperature for easier mixing.
- Don’t Rush the Rise: Allow the dough to rise fully; this gives your rolls a light and airy texture.
- Use Fresh Garlic: Freshly minced garlic provides the best flavor compared to pre-minced options.
- Experiment with Cheese: Try different cheeses like cheddar or gouda for a unique flavor twist.
- Keep an Eye on Baking: Ovens can vary; check your rolls a few minutes before the suggested bake time.
- Rest Before Serving: Let the rolls sit for a few minutes after baking for easier handling.
- Brush Generously: Don’t be shy with the garlic butter; it enhances flavor and adds a beautiful sheen.
Common Mistakes and Troubleshooting
Even the best cooks can make mistakes. Here are some common pitfalls and how to avoid them:
- Dense Rolls: This can happen if the dough is over-kneaded or not allowed to rise adequately. Be gentle and patient!
- Burnt Tops: If the rolls brown too quickly, tent them with aluminum foil to prevent burning while they finish baking.
- Dry Dough: If your dough feels too dry, you may have added too much flour. Add a little milk to achieve the right consistency.
- Flavorless Rolls: Always season the dough well and ensure you’re using fresh garlic and butter for the best taste.
Delicious Variations
While the classic cheesy garlic rolls are divine as they are, don’t hesitate to mix it up with these delightful variations:
- Herb-Infused: Add dried Italian herbs like oregano or thyme to the garlic butter for an aromatic twist.
- Spicy Kick: Incorporate crushed red pepper flakes into the cheese filling for a spicy version.
- Cheesy Spinach: Mix in cooked spinach with the cheese for a nutritious addition.
- Sweet Garlic Rolls: For a sweeter variation, try adding cinnamon and sugar to the dough and serve with a honey glaze.
Make-Ahead and Storage Instructions
If you want to prepare your rolls in advance, here’s how:
- Make Ahead: Prepare the dough and shape the rolls. Place them in the baking pan, cover with plastic wrap, and refrigerate for up to 24 hours. Let them come to room temperature and rise before baking.
- Storage: Store leftover rolls in an airtight container at room temperature for up to 2 days, or freeze for up to 3 months. Reheat in the oven for a few minutes before serving.
Frequently Asked Questions
Here are some common questions about making cheesy garlic rolls:
- Can I use instant yeast instead of active dry yeast? Yes, you can use instant yeast; just skip the activation step.
- What can I serve with garlic rolls? They pair beautifully with soups, salads, or as a side to any main dish.
- Can I substitute the cheese? Absolutely! Feel free to experiment with your favorite cheeses.
- How do I know when the rolls are done? They should be golden brown and sound hollow when tapped on the bottom.
- Why is my dough not rising? Check the expiration date on your yeast; it may be inactive. Ensure the environment is warm enough for rising.
- How can I make them vegan? Substitute the egg with flaxseed meal and use plant-based milk and butter.
- Can I make them gluten-free? Yes, using a gluten-free flour blend works well in this recipe.
- What’s the best way to reheat them? Reheat in a preheated oven at 350°F for about 10 minutes for the best texture.
Nutritional Tips and Dietary Adaptations
As we celebrate the joy of making cheesy garlic rolls, it’s also important to consider dietary needs. Here are some tips:
- Whole Grain Flour: For a healthier option, substitute half of the all-purpose flour with whole wheat flour.
- Low-Fat Dairy: Use low-fat milk and cheese to reduce calories without sacrificing flavor.
- Plant-Based Options: Use plant-based butter and cheese for a vegan-friendly version.
- Fresh Herbs: Incorporating fresh herbs not only enhances flavor but also adds nutritional value.
Essential Equipment Recommendations
To ensure a smooth baking experience, here are some tools I highly recommend:
- Stand Mixer: This makes mixing and kneading the dough a breeze.
- Rolling Pin: Essential for rolling out the dough evenly.
- Baking Pan: A 9×13 inch pan is perfect for these rolls.
- Kitchen Thermometer: Useful for checking milk temperature for yeast activation.
Serving Suggestions
When it comes to serving these cheesy garlic rolls, the possibilities are endless! Here are some ideas:
- With Dipping Sauces: Serve with marinara or garlic dipping sauce for extra flavor.
- As a Side Dish: Pair with your favorite pasta dishes, soups, or salads.
- For Breakfast: Enjoy them warm with a spread of butter or jam.
- At Parties: These rolls are great for gatherings; serve them warm on a platter for everyone to enjoy!
As we conclude this culinary journey, remember that cooking isn’t just about the food; it’s about the love and memories we share. These cheesy garlic rolls are a perfect example of how a simple recipe can bring us closer together and fill our hearts with warmth. Gather your loved ones, roll up your sleeves, and get ready to create something special. Happy baking!
Cheesy Garlic Rolls
Ingredients
Dough
- 3 1/2 cups all purpose flour 455g
- 2 1/4 teaspoons active dry yeast
- 1 tablespoon granulated sugar
- 1 teaspoon salt
- 1 large egg room temperature
- 1 cup whole milk warmed to 100-110F
- 6 tablespoons unsalted butter, softened
- 1/2 cup unsalted butter room temperature
- 2 tablespoons finely minced garlic
- 2 tablespoons fresh parsley, finely chopped
- salt to taste salt
- black pepper to taste black pepper
- 3 cups mozzarella cheese, shredded
- 1/2 cup parmesan cheese, shredded
- 1 large egg
- 1 tsp water
Instructions
- Activate yeast by mixing warm milk, sugar, and yeast; wait 8-10 minutes until foamy.
- Add egg, flour, and salt to the yeast mixture; mix until a dough forms.
- Knead in softened butter, then let the dough rise in a greased bowl until doubled (~60-90 min).
- Prepare garlic butter with butter, garlic, parsley, salt, and pepper. Roll out dough, spread garlic butter, add cheeses, then roll and cut into 8 pieces.
- Arrange rolls in a greased pan, let rise (~25-35 min), then brush with egg wash and bake at 350°F (175°C) for 25-30 min until golden.
- Melt remaining garlic butter and brush over warm rolls before serving.