
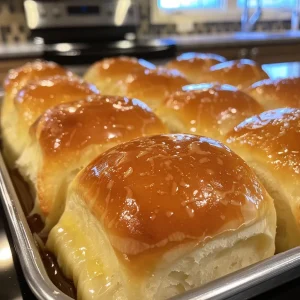
The Heartwarming Magic of Quick Dinner Rolls
There’s something undeniably enchanting about the aroma of freshly baked rolls wafting through the air, reminding us of family gatherings, laughter, and love. Quick dinner rolls are not just a side dish; they are a symbol of togetherness, a way to say “I care.” This recipe is designed for everyone—from the novice baker to the seasoned home cook—who wishes to create something special in a short amount of time. Let’s embark on this delightful journey into the world of quick dinner rolls, where we’ll explore not just a recipe but the memories that come with it.
Why You’ll Love This Recipe
- Quick and Easy: In just under an hour, you’ll have warm, fluffy rolls ready to serve.
- Versatile: These rolls can accompany any meal, from Sunday dinner to festive feasts, or even be enjoyed with a simple spread of butter.
- Perfect for Sharing: The joy of pulling apart a warm roll at the dinner table creates moments of connection and laughter.
- Beginner-Friendly: With straightforward steps, even those new to baking can successfully recreate this cherished recipe.
- Customizable: Add herbs, cheese, or spices to transform the flavor and make it your own!
Ingredients Breakdown
To make these luscious quick dinner rolls, gather the following ingredients:
- ¾ cup warm milk (110°F): This warmth activates the yeast. If you don’t have milk, feel free to substitute it with almond or oat milk.
- ½ cup warm water (110°F): Essential for hydrating the dough. Make sure it’s warm, not hot, to keep the yeast happy.
- 2 tablespoons granulated sugar: This sugar feeds the yeast, helping the rolls rise beautifully.
- 2¼ teaspoons (1 packet) active dry yeast: The magic ingredient that brings these rolls to life.
- 2 tablespoons unsalted butter, melted: Adds richness and flavor. You can use olive oil for a healthier twist.
- 1 teaspoon salt: Enhances flavor; don’t skip it!
- 1 large egg: Provides structure and a tender texture; a flax egg can be a great vegan alternative.
- 3½ cups all-purpose flour (more if needed): The foundation of our rolls; whole wheat flour can be used for a heartier roll.
- 4 tablespoons unsalted butter: For brushing on top, creating a beautiful golden finish.
- Pinch of flaky sea salt (optional): For that touch of gourmet flair.
Step-by-Step Instructions

Ready to roll up your sleeves? Here’s how to make these quick dinner rolls:
- Activate the Yeast: In a mixing bowl, combine the warm milk, warm water, sugar, and yeast. Stir gently and let sit for 5 to 10 minutes until foamy on top.
- Make the Dough: Add melted butter, salt, and egg to the yeast mixture. Mix well. Gradually add the flour, one cup at a time, using a dough hook or wooden spoon until a soft ball forms.
- Knead the Dough: Knead on medium speed for 5–7 minutes, or by hand for about 10 minutes, until smooth and elastic. If it’s too sticky, add a bit more flour.
- First Rise: Cover the bowl with a towel or plastic wrap and let rise in a warm place for 20–30 minutes until slightly puffy.
- Shape the Rolls: Turn the dough onto a floured surface, divide into 12 equal pieces, and roll into balls. Place them in a greased 9×13-inch baking dish.
- Second Rise: Cover again and let rise for 15–20 minutes until noticeably puffy.
- Bake: Preheat your oven to 400°F. Bake for 16–18 minutes until golden brown.
- Make the Brown Butter Glaze: While baking, melt 4 tablespoons of butter in a saucepan over medium heat until golden brown and nutty—about 4–5 minutes.
- Finish the Rolls: Brush the warm rolls with the brown butter. Sprinkle with flaky sea salt if desired. Serve warm, and watch them disappear!
Pro Tips for Perfect Rolls
- Temperature Matters: Ensure liquids are warm, not hot, to properly activate the yeast.
- Flour Consistency: Use the scoop and level method to measure your flour; too much can lead to dry rolls.
- Don’t Rush the Rises: Allow the dough to rise adequately; this is key to achieving that fluffy texture.
- Experiment with Flavors: Add garlic powder, herbs, or cheese to the dough for a unique twist.
- Check for Doneness: Rolls should be golden brown and sound hollow when tapped on the bottom.
- Keep Them Warm: If not serving immediately, wrap the rolls in a clean towel to keep them warm and soft.
- Use Quality Ingredients: Fresh yeast and quality butter can make a significant difference in flavor.
- Storage Tips: Store any leftovers in an airtight container to maintain freshness.
- Make Ahead: Pre-shape rolls and refrigerate them before the second rise for a quick bake later.
- Freezing Rolls: Freeze unbaked rolls for up to a month; let them thaw and rise before baking.
Common Mistakes and Troubleshooting
- Too Dense Rolls: If your rolls are dense, try kneading longer or ensuring the yeast was fresh and activated.
- Not Rising: Make sure your yeast is active; if the mixture doesn’t foam, it’s likely dead.
- Overbaking: Keep an eye on the rolls towards the end of baking. Check for a golden color to prevent dryness.
- Sticky Dough: If your dough is too sticky, incorporate a little more flour, but be cautious not to overdo it.
Delicious Variations
Feel free to play around with this base recipe! Here are some variations you might enjoy:
- Cheesy Rolls: Add shredded cheese directly into the dough for a cheesy surprise.
- Herb-Infused: Incorporate fresh or dried herbs like rosemary or thyme for an aromatic twist.
- Sweet Rolls: Add cinnamon and sugar to the dough, and top with icing for a delightful treat.
- Garlic Butter Rolls: Brush with garlic butter before baking for a savory side.
Storage and Make-Ahead Instructions
These rolls are best enjoyed fresh, but they can be stored or made ahead:
- Storing: Keep leftover rolls in an airtight container at room temperature for up to 3 days, or refrigerate for up to a week.
- Freezing: Freeze baked rolls in a freezer-safe bag for up to 3 months. Reheat in the oven at 350°F for 10-15 minutes.
- Make Ahead: You can prepare the dough and shape the rolls, then refrigerate overnight before allowing them to rise and bake.
Frequently Asked Questions
- Can I use whole wheat flour? Yes, but you may need to adjust the liquid to accommodate the denser texture.
- What if my rolls don’t rise? Ensure your yeast is fresh and that the environment is warm enough for rising.
- Can I double the recipe? Absolutely! Just make sure your mixing bowl is large enough to handle the increased volume.
- How do I know when my rolls are done? They should be golden brown and sound hollow when tapped on the bottom.
- Can I make these rolls vegan? Yes! Substitute the egg with a flax egg and use plant-based milk and butter.
- What’s the best way to reheat leftover rolls? Wrap them in foil and warm in the oven to retain softness.
- How can I make these rolls sweeter? Add sugar or honey to the dough for a sweeter flavor profile.
- Can I use instant yeast instead of active dry yeast? Yes, but you can skip the activation step and mix it directly with the dry ingredients.
Nutritional Tips and Dietary Adaptations
Consider these options to adapt the recipe for different dietary needs:
- Gluten-Free: Use a gluten-free flour blend to accommodate gluten sensitivities.
- Low-Carb: Experiment with almond flour or coconut flour for lower-carb options.
- Dairy-Free: Substitute all dairy products with plant-based alternatives to make these rolls dairy-free.
Essential Equipment Recommendations
To make your baking experience smoother, here’s a list of essential equipment:
- Mixing Bowl: A large mixing bowl is essential for combining and kneading your dough.
- Dough Hook: If you have a stand mixer, a dough hook makes kneading a breeze.
- Baking Dish: A 9×13-inch baking dish is perfect for holding your rolls.
- Kitchen Towel: Use a clean towel to cover your dough during rising times.
Serving Suggestions
These quick dinner rolls can be served in various delightful ways:
- With Butter: Serve warm with a slab of butter for the classic experience.
- With Jam: Pair the rolls with fruit preserves or jam for a sweet touch.
- As Sliders: Use them to make mini sandwiches, perfect for gatherings.
- With Soup: Serve alongside your favorite soup for a comforting meal.
Conclusion
In just a little over an hour, you can fill your home with the warm, inviting scent of quick dinner rolls—each bite a reminder of the love and care put into sharing a meal. Whether enjoyed during a family dinner or as a delightful addition to a festive gathering, these rolls are sure to create lasting memories. So, roll up your sleeves, gather your loved ones, and let’s celebrate the magic of cooking together!
Quick Dinner Rolls Recipe
Ingredients
Dough
- 0.75 cup warm milk 110°F
- 0.5 cup warm water 110°F
- 2 tablespoons granulated sugar
- 2¼ teaspoons active dry yeast 1 packet
- 2 tablespoons unsalted butter, melted
- 1 teaspoon salt
- 1 large egg
- 3½ cups all-purpose flour more if needed
- 4 tablespoons unsalted butter
- Pinch optional flaky sea salt
Instructions
- Combine warm milk, water, sugar, and yeast; let sit 5-10 min until foamy.
- Add melted butter, salt, and egg; gradually mix in flour until dough forms a soft ball.
- Knead dough 5-7 min until smooth; let rise in warm place for 20-30 min.
- Divide dough into 12 pieces, shape into balls, place in greased dish, and let rise 15-20 min.
- Preheat oven to 400°F; bake rolls 16-18 min until golden. Melt butter and brush on rolls; sprinkle with sea salt if desired.