
Welcome to the Heartfelt Art of Making Easy Overnight Sourdough Bread
There’s something truly magical about baking bread at home, especially when it comes to sourdough. The aroma wafting through your kitchen, the golden crust forming in the oven, and the first warm slice slathered with butter—all of these moments evoke a sense of nostalgia and warmth that brings families and friends together. In this article, I’ll take you through my beloved recipe for easy overnight sourdough bread, a dish that is more than just a loaf; it’s a heartfelt creation meant for sharing and celebrating life’s simple joys.
As we dive into the process, you’ll discover why this recipe is perfect for both beginners and seasoned bakers alike. Whether you’re looking to impress at your next family gathering or simply want to enjoy a slice with your morning coffee, this easy overnight sourdough bread is sure to become a cherished staple in your home. So let’s roll up our sleeves and get started!
Why You’ll Love This Recipe
This easy overnight sourdough bread is packed with benefits that make it a delightful choice for any home baker:
- Minimal hands-on time: With just a few minutes of prep work, you can let the dough do its magic overnight while you rest.
- Perfect for beginners: No kneading required! This recipe uses a simple folding technique, making it accessible for everyone.
- Deliciously rustic flavor: The long fermentation process enhances the bread’s natural flavors, creating a deep, tangy taste.
- Health benefits: Sourdough is known for its digestibility, thanks to the fermentation process that breaks down gluten and phytic acid.
- Customizable: Easily add your favorite herbs, spices, or mix-ins to create a loaf that’s uniquely yours!
Ingredient Breakdown and Substitutions
Now that you’re excited about the recipe, let’s take a closer look at the ingredients you’ll need and some lovely substitutions:
- Levain: 50 g active sourdough starter (100% hydration) – If you don’t have a starter yet, you can easily make your own or purchase from a local bakery.
- Whole wheat or bread flour: 25 g – For a nuttier flavor, consider using whole wheat flour instead.
- Tepid water: 25 g – Always use water that’s not too hot or too cold to keep your starter happy.
- Dough: Combine all the levain with 50 g whole wheat flour, 450 g strong bread flour, and 375 g slightly warm water.
- Fine sea salt: 10 g – This is essential for flavor but can be substituted with kosher salt in a pinch.
Pro Tips for Success
Before we jump into the step-by-step instructions, here are some expert insights to ensure your sourdough journey is a smooth one:
- Feed your starter: Make sure your starter is active and bubbly before using it. Feed it a few hours before you start baking.
- Watch the temperature: If your kitchen is cool, the fermentation process may take longer. You can place your dough in a slightly warm spot.
- Don’t rush the rise: Allow the dough to rise until it’s puffy and full of bubbles; this is crucial for a good texture.
- Use a Dutch oven: This helps create steam, resulting in a beautiful crust. Preheat it well before adding your dough.
- Be gentle: When shaping and handling the dough, be gentle to retain the air bubbles that will give your bread its lovely texture.
- Practice makes perfect: If your first loaf doesn’t turn out as expected, don’t be discouraged! Every bake is a learning experience.
Common Mistakes and Troubleshooting
Even seasoned bakers can encounter hiccups along the way. Here are some common issues and how to troubleshoot them:
- Dough didn’t rise: This could mean your starter wasn’t active enough. Always make sure it’s bubbly and has doubled in size before using.
- Crust too dark: If the bottom of your bread is getting too dark, lower the oven temperature slightly.
- Too sticky dough: If your dough is too sticky to handle, you may need to add a bit more flour during the mixing stage.
- Dense bread: This often happens if the dough hasn’t fermented long enough or was over-kneaded; gentle handling is key.
Step-by-Step Instructions for Baking
Let’s dive into the process of making your own easy overnight sourdough bread:
1. Make the Levain
In a small jar, mix together 50 g of your active sourdough starter, 25 g of whole wheat or bread flour, and 25 g of tepid water until a paste forms. Cover and let it ripen at room temperature for 6-8 hours. I usually do this in the evening so I can bake the next morning; the levain will be bubbly and doubled in size.
2. Mix the Dough
In a large mixing bowl, combine the levain, 450 g of strong bread flour, 50 g of whole wheat flour, and 375 g of slightly warm water. Mix until a shaggy dough forms. Knead gently by hand until all the flour is incorporated. Cover the bowl and let it rest for 1 hour to allow the flour to fully hydrate, known as autolyse.
3. Incorporate the Salt
After the autolyse, sprinkle 10 g of fine sea salt over the dough. Using wet hands, gently knead to incorporate the salt. Cover the dough again and let it rest for 45 minutes.
4. Lamination (Optional)
This step adds strength to the dough, which is important for achieving a nice open crumb. Lightly spray your counter with water and scrape the dough out into a thin sheet. If you’d like, sprinkle in any mix-ins like herbs or cheese, then fold the dough over itself as you would a letter. Place it back in a greased container and cover.
5. Folds and Bulk Fermentation
We’ll apply folds instead of kneading. Grab the dough from one side, lift it, and fold it over itself, rotating the bowl each time. Repeat this four times. Let the dough rest for 30 minutes and repeat this process two more times, aiming to complete this within 2 hours.
6. Shape the Dough
After the folds, let the dough rise undisturbed in a warm location until puffy and bubbly (about 2 hours). Prepare your proofing basket by lining it with kitchen towels and dusting with flour. Turn the dough out onto a floured surface and shape it into a log. Transfer it seam side up into the prepared basket and cover with plastic wrap. Place it in the fridge to proof overnight.
7. Preheat and Bake
Preheat your oven to 475°F (245°C) and place a Dutch oven inside to heat for about 40 minutes. When ready, gently turn the dough onto a piece of parchment paper, seam side down. Score the top if desired, then carefully lower it into the hot Dutch oven, cover, and bake for 25 minutes. Remove the lid, lower the oven temperature to 450°F (232°C), and bake for another 20 minutes until golden brown.
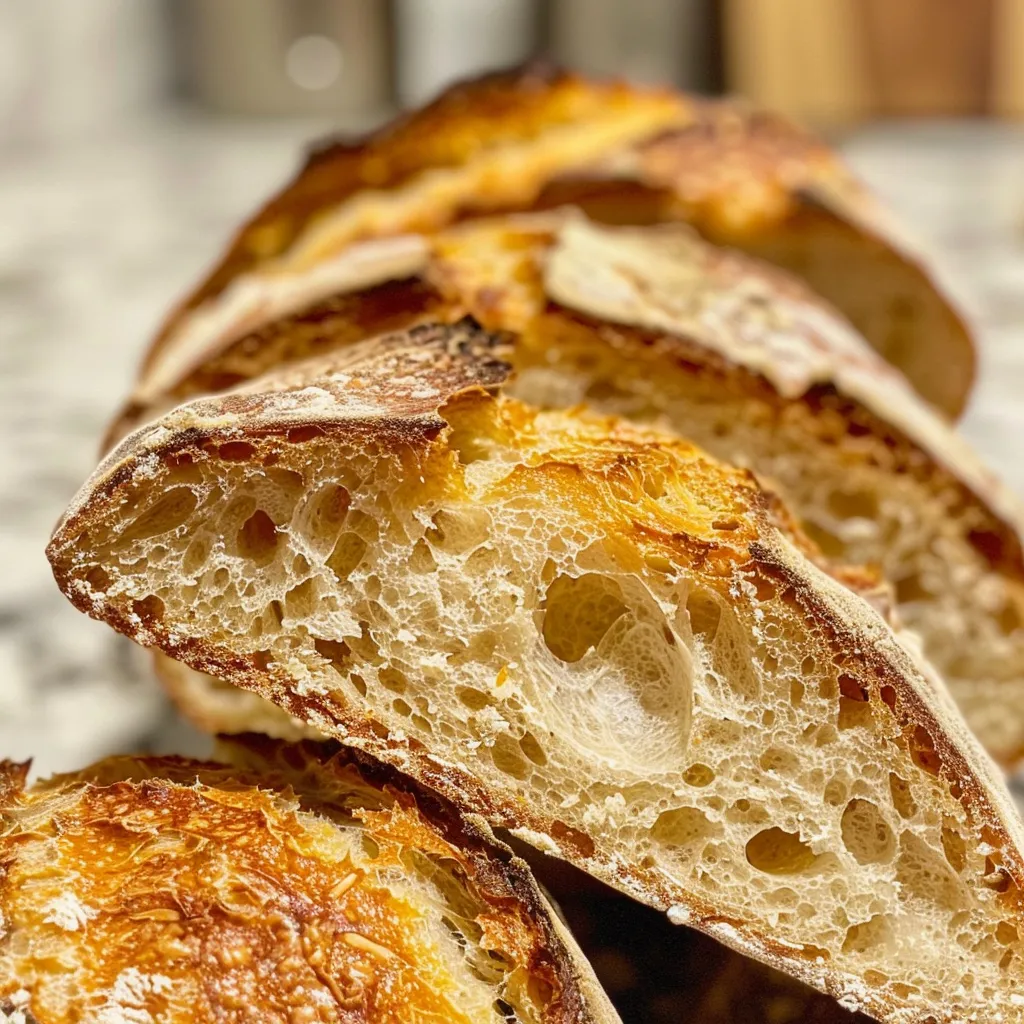
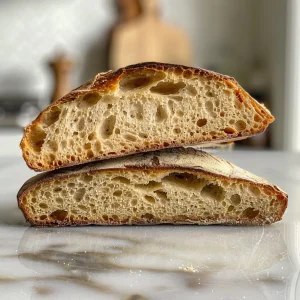
8. Cool and Slice
Once baked, remove the bread from the pot and let it cool on a wire rack for at least 2 hours before slicing. This is essential for the crumb to set properly.
Variations to Explore
Feel free to get creative with your sourdough! Here are some delicious variations to try:
- Herb-infused sourdough: Add fresh chopped herbs like rosemary or thyme to the dough during the lamination step for a fragrant twist.
- Cheesy goodness: Fold in grated cheese like cheddar or Parmesan for a savory version that pairs beautifully with soups.
- Dried fruit and nuts: Incorporate chopped dried fruits and nuts for a sweet, hearty loaf that’s perfect for breakfast.
- Spicy kick: Add crushed red pepper flakes or chopped jalapeños to the dough for a warm, spicy flavor that’s great with dips.
Storage and Make-Ahead Instructions
This sourdough bread can be stored at room temperature in a bread box for up to 3 days. If you want to keep it longer, slice it and freeze the pieces in an airtight bag for up to a month. To enjoy, simply toast slices directly from the freezer.
Common FAQs
Here are some frequently asked questions to help guide you in your sourdough baking:
- How do I know if my starter is ready? Look for bubbles and a rise in volume; it should double in size within a few hours of feeding.
- What if my dough is too wet? If the dough is too sticky, you can gradually add a little more flour as you mix.
- Can I use all-purpose flour? Yes, but bread flour has a higher protein content, which will give you a better structure.
- Why is my bread too dense? This can happen if the dough didn’t rise enough or was over-kneaded; always be gentle!
- How can I achieve a crustier loaf? Baking in a Dutch oven helps create steam, which is essential for a crispy crust.
- Can I make this dough in advance? Yes, you can prepare the dough and shape it, then store it in the fridge overnight before baking.
- What’s the best way to slice sourdough bread? Always use a serrated knife for clean cuts, and let it cool completely before slicing.
- Can I use whole wheat flour entirely? You can, but it may yield a denser loaf. I recommend mixing it with bread flour for the best texture.
Nutrition Tips and Dietary Adaptations
Sourdough bread is not only delicious but also has some health benefits:
- Lower glycemic index: The fermentation process can lower the glycemic index, making it a better option for blood sugar control.
- Digestibility: Many find sourdough easier to digest compared to regular bread due to the fermentation process.
- Gluten sensitivity: Some individuals with gluten sensitivity may tolerate sourdough better, although it’s not gluten-free.
- Vegan options: All the ingredients used are plant-based, making this recipe suitable for vegans!
Equipment Recommendations
Having the right tools can make a significant difference in your baking experience:
- Dutch oven: A heavy cast iron Dutch oven is ideal for creating a steamy environment for your bread.
- Proofing basket: This helps shape the dough while allowing for air circulation.
- Baking scale: A kitchen scale ensures accurate measurements for consistent results.
- Bench scraper: This handy tool makes handling dough easier and cleaner.
Serving Suggestions
Once your bread is baked and cooled, the possibilities for serving are endless:
- Classic pairing: Enjoy a warm slice with a pat of butter and a sprinkle of sea salt.
- Toast it up: Top toasted slices with avocado, tomatoes, or your favorite spreads for a delightful breakfast.
- Sandwiches: Use it as the base for hearty sandwiches filled with your favorite ingredients.
- Bruschetta: Slice and toast for a delicious bruschetta topped with fresh tomatoes and basil.
In closing, baking your own easy overnight sourdough bread is not just about creating a loaf; it’s about crafting memories and sharing love through food. I hope you find joy in every step of the process and that this recipe becomes a cherished part of your kitchen tradition. Happy baking, and may your home always be filled with the warmth of freshly baked bread!
easy overnight sourdough bread
Ingredients
Levain
- 50 g active sourdough starter (100 percent hydration)
- 25 g whole wheat or bread flour
- 25 g tepid water
Dough
- all the levain from above all the levain from above
- 50 g whole wheat flour
- 450 g strong bread flour
- 375 g slightly warm water
- 10 g fine sea salt
Instructions
- Mix starter, flour, and water; let ripen 6-8 hours until bubbly and doubled.
- Combine levain, water, and flours; knead into shaggy dough, autolyse 1 hour.
- Add salt, knead gently, and let rest 45 minutes. Optional lamination: stretch, fold, and shape dough into a bowl; refrigerate overnight.
- Perform folds every 45 minutes for 3 rounds; let rise until puffy with bubbles, about 2 hours.
- Shape dough into a log, place seam side up in a floured basket, cover, and refrigerate overnight.
- Preheat oven to 475°F with Dutch oven inside. Transfer dough onto parchment, score, and bake covered 25 min, then uncovered 20 min at 450°F. Cool 2 hours before slicing.